DIY Tesla Wall Connector with Load Management
This weekend I installed a Tesla Wall Connector and a Neurio W2 Power Meter and configured them for dynamic load management. Dynamic load management means that the EV charger will dial down the charge rate from 48A whenever the power meter detects that total load is close to the maximum load of the electrical service to the house. For houses like ours with 100A (or smaller) electrical connections that’s very convenient because we can charge our EV quickly without tripping the main breaker in the few brief instances where we’re both charging our car and running all the other electrical loads in the house.
You obviously should never do what I did and should always hire a licensed electrician and Tesla installer.
Parts
- Tesla Wall Connector. I bought this retail from the online Tesla store.
- “Tesla” Neurio W2 Power Meter. These can be had from eBay.
- Cable to connect Wall Connector and power meter. The part number is 1133339-00-A and I also bought one from eBay. It’s just a low-voltage, two-conductor cable with a 6-wire connector on one end. I’m sure it would be very easy to improvise but I couldn’t be bothered to figure out exactly what connector it uses. The cable does have a fancy QR-code tag on it, but scanning it is not part of the setup. Update: A commenter on Reddit notes that the comms cables are sold out and also provided helpful details on how to put together your own comms cable.
- Breaker, electrical wire (eg. 6/2 or similar THHN if you’re using conduit) and other stuff for wiring the wall connector.
Installation
- Install the Neurio Power Meter. There’s a good how-to video on YouTube. It’s unclear to me if the WiFi connection is required when paired with a Tesla Wall Connector but I added the antenna for good measure. The main challenge for me at this stage was finding a spot in our already busy electrical panel and fiddling with cables for CT clamps and so on.
- Install the Wall Connector. Ours is installed right below our electrical panel with the power wire coming from behind.
- Connect power meter and wall connector. I chose to drill a separate hole in the wall connector back-plate for the power meter comms cable instead of trying to run it with the power wires, mostly because the comms cable isn’t very long and that way I didn’t have to mess with trying to extend it. The Wall Connector has an elegant design where the power wires all attach to the back plate and then the face plate just slots on. Unfortunately the comms-port is not part of that scheme and is on the face-plate assembly. So you have to connect the power meter comms wires while balancing the face-plate and then secure the whole thing to the back-plate.
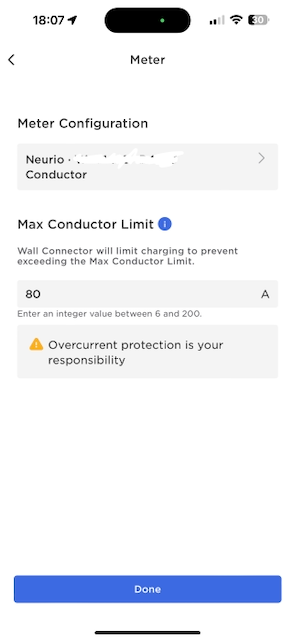
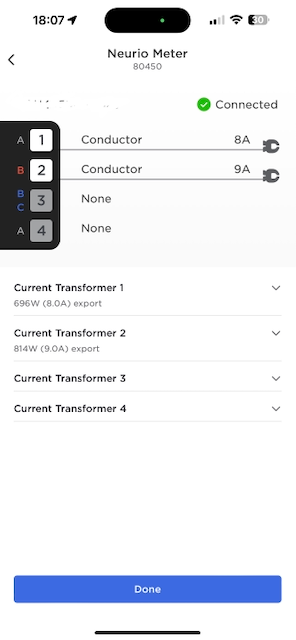
- Initialize the Wall Connector. You can do this using the Tesla One app. The app is supposedly only for Tesla employees and 3rd party contractors but you can log in using a normal retail Tesla user account just fine. When you scan the QR code that’s on the Neurio power meter it starts showing up as part of the install and you can configure the CT clamps. Check if you need to “flip” them to ensure the meter registers power flowing in the right direction (“import” vs. “export”). At this stage you can also configure the max load where you want EV charging to start dialing down. Note that I didn’t configure the Neurio separately, it was all through the Tesla app.

Summary
We took delivery of our Tesla a couple months ago and the power meter works great and we’ve had no main breaker trips for our 100A service.
We haven’t taken delivery of our Tesla car yet so I haven’t actually tested the dynamic load management. But I wanted to document this process since it does seem to work and the power meter registers with the Tesla app and site install and appears to be recognized. I’ll update this post when I’ve confirmed the setup works and throttles charging when we’re using all of our other appliances.
Leave a Reply