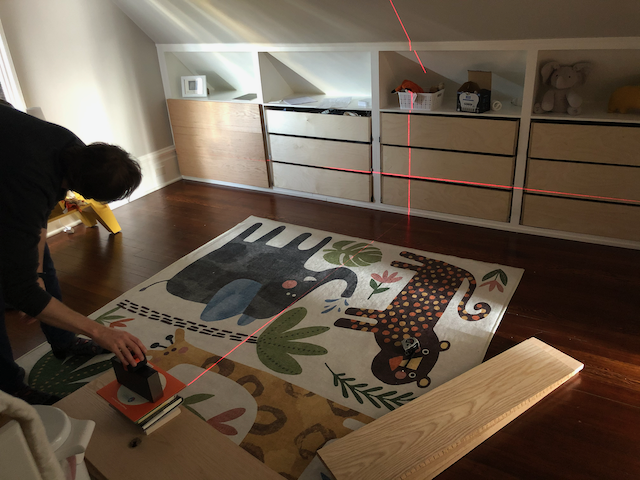
The UniFi software is much better. I’ve used ASUS routers for a decade and I quite like the ASUS software and how it grew out of the open source Tomate Project. But it’s also clear that it’s evolved through a process of accretion rather than design, with confusing and overlapping menus. And it has a system reboot scheduler feature that I had to use or the networking got stuck after running for a few days. The UniFi software is much more intuitive and well designed.
The UniFi WiFi hardware is better even though it doesn’t have the huge footprint and imposing antennas of the ASUS gear. I needed one ASUS router and 2 hardwired APs to cover our 2000 sqft condo, with a 4th AP in the garage. This gave great WiFi coverage, but the Dream Router 7 seems able to mostly cover the condo by itself. I’m getting an additional UniFi AP for the garage.
For context, we live in a rambling 2000 sqft victorian condo in a dense neighborhood in San Francisco with lots of other WiFi transmitters close by. The walls are lath-and-plaster (although not with wire mesh) and they soak up WiFi. A previous owner pulled CAT-6 ethernet between some rooms and I’ve extended that cabling. I’ve only ever used ASUS AiMesh with wired backhaul.
For work reasons we really need our internet to be up and we have dual-WAN redundant connections.
I bought my first ASUS RT-AC56U router way back in 2015. It was fast, and I used the built-in USB-drive-based NAS features to good effect. ASUS eventually dropped support for it and I got the RT-AX88U in 2019. Then I would get a new ASUS router every couple of years as a I got annoyed with bad WiFi coverage in a particular part of the condo, and used the old routers as AiMesh APs.
The only thing I’m missing with the UniFi gear is that the APs don’t have SFP+ ports for backhaul. But that’s because they generally rely on PoE for power, and that doesn’t work with SFP+. Overall I think that’s a good tradeoff.
I’m in the market for a new monitor setup for my Macs. I want one or two “retina” resolution displays and 5k 27” seems to be the best format for that. A nice-to-have would be fast integrated USB hub so I can attach high-performance peripherals like 2.5 Gbps USB-C NICs to the monitor and plug just the monitor cable into my laptop. The ultimate prize is full Thunderbolt support to allow daisy-chaining two monitors.
This is the state of my research as of March ’25. I’m going to ignore the obvious Apple Studio Display. While it checks all the boxes including daisy-chaining two displays, it’s too expensive. The other contenders are:
I’m not a graphics artist or video editor so I don’t need exacting color accuracy or specific color profiles. I’m (perhaps naively) assuming that all the displays have equivalent image quality for my purposes.
Based on the comparison above I’ll be getting the ViewSonic: The price is right and it has a fast USB hub.
We now have 3 kids ages 0 to 4 and have travelled extensively with them. In this post I’ll cover our motivations for doing so and share what tips and tricks I’ve accumulated over the past four years.
Nyhavn in Copenhagen
As we’ve gotten more children, the trips have only become more arduous. I remember our first trip with a baby to Mexico feeling like a lot, but thinking back on it now, having just completed a 6 week sojourn to Europe with 3 kids staying in 8 different cities, the Mexico trip was positively serene. I suspect this latest trip will be the last hard-traveling one we’ll do until the kids grow older, but who knows how I’ll feel next summer. It’s also worth keeping in mind that kids as small as ours likely won’t remember details of the trips in later life (although endearingly the 4-year old does remember past trips year-to-year, and will name things he wants to visit again).
So what are our motivations for going on these trips?
Satisfy own travel desire: Both my partner and I travelled a lot before having kids, both before we met and after (but before having kids). The parental leaves we both get are unique-in-a-lifetime opportunities to pack long trips into otherwise busy careers. I’ll list other reasons below, but realistically this is the primary motivation
Family: Part of the reason we go is to visit my family in Denmark, and giving our kids a chance to spend time with grandparents, aunts, uncles and cousins (and vice-versa)
Intense family time: Traveling means we’re all together, all the time, doing stuff. Even when on leave but at home, I end up spending time fixing stuff on the house, working on my own projects or otherwise not spending time with the kids. That’s not an option when traveling. The best way I have to quantify this in a positive way is the shared photo album I use to share family photos with friends and extended family: When we’re on trips, I record way more memorable moments in the album than when at home
Showing kids the world: It’s fun to show your kids places that are new and different and experiencing the novelty and surprise through their eyes.
List of random insights related to traveling with kids
Kitchen or kitchenette: We’ve bottle-fed our babies but we’re not super fussy about sterilizing and so on. Even so, you really need at least a kitchenette to keep bottles clean, especially in places like Mexico where the tap-water may be dodgy. Trying to clean bottles with bottled water in a hotel bathroom sink is miserable.
Family-hosted AirBnBs with toys: Partly on previous trips and especially on the last one we’ve tried hard to stay at AirBnBs rented out by families living there, with toys, changing tables and other kid-paraphernalia. That as opposed to hotels or full-time AirBnBs that tend to be much more “sterile”. This has been a great success, and it means that, for the kids, traveling to new places is an exiting occasion akin to Christmas morning, with a whole new complement of never-played-with toys waiting at the destination.
Longer stays than when traveling without kids: we travelled pretty hard before having kids, staying only one or two nights at each destination and packing in lots of sightseeing in a short amount of time. This is not pleasant with kids. There’s much more packing and unpacking and getting settled in, so you need more time each place and just more time overall. This is a lesson we had to re-learn a couple of times, and policy for our last trip was to stay at least 5 nights each place. If we travel again I suspect we’ll make that even longer.
Packing nets: Keeping 5 people’s clothes organized across several suitcases is impossible without packing nets and bringing a separate piece of luggage for each traveller doesn’t scale. Packing nets solves this problem. My favorite kind is from MUJI. They’re very light, durable and made from a slippery material that eases packing
Lunch and snacks: Packing school lunch and snacks is not my favorite activity but I keep doing it even when we’re on vacation. Finding lunch and snacks when out and about and on a schedule can be stressful, especially since our kids are not exactly the most adventurous eaters. And both me and the kids will feel bad (for different reasons) if they end up eating french fries every day. Having just a minimum of lunch and snacks packed in the morning helps with this
Getting around cities: European cities are generally good destinations for kids. There’s lots to see, including children’s museums and good playgrounds, and public transport is good. One thing to note is that Uber or taxies are not a particularly attractive choice when you have 3 kids and a stroller: you have to get a large van-type one, and even then, loading and disgorging everything takes ages. Public transport is much more pleasant because you can just drive a stroller on to a bus or train. Counterintuitively, European cities not always all that pleasant to talk around, chiefly because sidewalks are sometimes narrow and come with many curbs and stairs.
Stroller: If you have small kids you’ll obviously need a stroller for walking around cities, taking naps and so on. I’m not the stroller expert in our relationship and our partner got us the UPPAbaby Vista which is a big stroller that can be configured with up to two seats. I have a love-hate relationship with that thing. On the one hand I’m thankful for all the places it’s taken us and the amount of abuse it has accepted. We did break our original one in Berlin on our latest trip, but I don’t hold that against UPPAbaby and we immediately bought a new one of the same make. The flip side is that the Vista is heavy and requires partial disassembly to collapse. While possible, schlepping it up or down stairs when no elevator is available is not enjoyable.
Scooters: Both our boys (currently aged 2 and 4) love riding scooters (and bikes) in San Francisco and we brought them on the trips even though they’re bulky. Because we stay in big cities there’s typically lots of walking around between sights, restaurants and where we’re staying. The scooters avoid so many “I’m tired of walking” and “Are we there yet” complaints.
How much to pack: My partner and I have endless debates about how much stuff to bring. For the last couple of trips we’ve arrived roughly at an amount that can barely fit into a mid-size station-wagon or a small minivan. Or more concretely 2 large suitcases, one small suitcase, a large stroller with two seats and a handful of smaller diaper bags and other bags. This is too much in my opinion, chiefly because it makes loading cars, boarding trains and airplanes and getting into condos a major chore (for me). Less luggage would mean more flexibility and less schlepping. We’re on the road for many weeks and are dependent on access to washing machines, so you might as well just embrace that, bring less and do laundry like you would at home.
iPads: We mostly don’t let our kids use iPads at home, but we do bring them on trips. They help a lot with air travel and long train and car rides and at restaurants. Other than those occasions we don’t use them, both because they turn the kids into zombies and also to preserve novelty for when they’re really needed.
Air travel: Many parents seem to have a mortal fear of planes and kids, and it can certainly be bad. In my opinion so far, the “worst” age is from when they can start crawling and walking and until they can focus on an iPad (maybe around 2). Before around 6 months they can be in a bassinet if you get one of those seats, or you can hold them or lay them on a spare seat without too many problems. After age 2 they can watch iPads or the in-flight entertainment. But between 6 months and two years they tend to endlessly squirm, crawl or walk around unless sleeping, which can be tiring. We give our kids low doses of melatonin on long flights if it helps them align sleep with the timezone we’re going to. Ultimately, the worst that can happen is that you’re stuck entertaining/consoling your toddler non-stop for the duration of the flight. And that sucks on a long flight, of course, but it’s a finite amount time and then you’re through.
Chargers: Between phones laptops, iPads and headphones our charging requirements phenomenal. On the last trip I brought two high-powered 4-port chargers, but even that seemed insufficient at times. I recommend compact +100W multiport chargers with built-in travel adapters.
Trips
Mexico February-March ’20 with first kid about 2 months old
We flew to Cancun on the Caribbean cost, rented a car and then drove to Tulum. We then spent a month crossing the Yucatan peninsula and crossing all the way to the Pacific and Puerto Escondido, before doubling back to Oaxaca and flying home. We stayed places between 2-4 nights. It was a good trip, but we also learned some lessons:
Area is too hot for family travel for us. My heat endurance changed with kids because you have strollers and more luggage and dealing with all that is much worse when it’s hot. Also note that this is not (as far as I know) a time-of-year thing for that area, it’s literally scorching year round. This is a great shame, since the route contains several large and elegant cities like Merida and spectacular walled colonial towns on the coast. And of course the amazing Maya ruins. Campeche was particularly hot, San Christobal was nice.
Beaches are tricky for kids/babies. The beach in Tulum is epic for adults, but terrible for kids because the surf is too high (at least when we were there).
Not a new insight but long car drives can be hard when a baby is just not up for being in the car seat for a long time.
A novel part of this trip was the COVID pandemic unfolding slowly and somehow at a distance as we made our way across Mexico. We got back to San Francisco in the nick of time before everything shut down, with a suitcase full of beans and rice in case we couldn’t get groceries.
Denmark Summer ’20, first kid about 7 months old
At this point the US was still mired in lockdowns and international travel was generally not possible. Except it was OK for me as a Danish national to return to Denmark with my family, so that’s what we did. Traveling during this period was eerie, with almost empty planes flying to maintain landing slots and the few passengers wearing masks and (some) face shields.
On this trip we mostly stayed in Copenhagen but also went on road-trips around Denmark and to Bornholm (through Sweden, which involved international road travel and exotic checkpoints in the middle of Øresund) and we flew to Anholt, a small island in Kattegat.
This was a pretty problem-free trip and it was nice to get to a place with slightly fewer COVID restrictions. Some takeaways:
I obviously have home-team bias but Danish beaches are uniquely well-suited for kids. The water in summer is still a little cold, but except for Vesterhavet, there’s hardly any surf and many beaches have excellent sand.
We stayed on an AirBnB-rented docked boat in Roskilde harbor for a while. The boat was both epic and a fail because we had to spend a lot of time ensuring our toddler didn’t crawl off the stern.
Beaches in Denmark
Denmark Christmas ’20, first kid about 1 year old
We went back to Denmark for Christmas the first year after our first son was born. It was great to spend Christmas with my family, but overall Denmark is miserable in the depth of winter, even compared to California’s rainy season. We haven’t repeated this trip since, even though I miss Christmas in Denmark.
Denmark Summer ’21, first kid about 18 months old
International travel was still not generally possible, so back to Denmark we went. This was the first time our son was old enough to really do stuff, and we went to LEGOLAND with my parents and to many beaches. LEGOLAND really is a neat park for smaller kids and we’ve come back every year since.
LEGOLAND
We also went back to Bornholm, and have returned there every summer since. It’s really is a pleasant place (and my aunt and uncle live there to boot) with better-than-Danish-average weather and some good beaches. It also has immense number of tourists visiting without really feeling overrun, enough to support a large number of small museums and other attractions like restored windmills, small amusement parks and so on. The museums are uniformly parochial and odd, but they’re also perfect for a rainy-day visit with curious kids.
I contrived for us to stay on a boat again, this time while in Copenhagen. This time it was a more proper houseboat (but still not great with stroller), and in fact it was the very houseboat that was where the guy in The Bear (TV show) lived while working in Copenhagen.
Iberian Peninsula May ’22, kids 2 1/2 and 1 month
International travel had finally opened back up. Based on airfare pricing we flew to Portugal, rented a car and drove around Portugal and southern Spain, including Lisbon, Seville, Cordoba, Granada, Tarifa and Gibraltar. This area was also somewhat hot for our tastes, and beaches had some of the same challenges as Mexico. Total time away was 4 weeks.
Lisbon
The highlight of the trip for me was probably Gibraltar, but I’m also an anglophile and I enjoy looking at Second World War stuff. Seeing planes land and take off at Gibraltar airport was spectacular from the top of the Rock.
The food is Portugal was excellent. Southern Spanish cuisine was a disappointment in comparison: lots of fried potatoes with everything. I had somehow assumed that all Spanish food was like the tapas-stuff you get around Barcelona (which I like) but that wasn’t really the case.
With two kids we started bringing so much stuff that it barely fit in a car, and the debates about packing became more earnest. From then on I made sure that places we stayed were either on the first floor or had an elevator.
Denmark and Sicily late summer/fall ’22
We spent time in our old haunts in Denmark, eg. Bornholm and Copenhagen. Then we went to Sicily for 3 weeks. We had originally planned to stay longer and maybe travel to other parts of Italy, but we were tired and went home early.
I had high hopes for Sicily because I had gone there on one of our best vacations ever before we had kids. Unfortunately it was too hot, even in mid-September. And Sicily is not very highly developed, which is much more noticeable with kids. Our toddler loves pasta though, so at least the food part really panned out and it was not a bad trip overall.
Can’t go wrong with pasta and iPad
Denmark and Germany summer ’23, kids 1 and 3
There was no parental leave this time so we were gone just 4 weeks with one of those weeks working remote. We did Denmark once again, visiting Bornholm and LEGOLAND. This was the first time we encountered the more changeable Danish summer weather (i.e. rain), which was a bummer.
We also drove to Hamburg in Germany, which was something of a revelation. It’s a very large and well-organized city. Miniatur Wunderland was the best attraction but the harbor tour of the industrial harbor and the walking tunnel under the Elbe were also great. Hamburg playgrounds are next-level, with free zip-lines, water cannon and diggers.
Hamburg Harbor
Europe late summer ’24, kids 4 months, 2 and 4
To avoid the experience of previous years and avoid rain and heat we had made almost no plans ahead of time and were committed to organizing the trip as we went along. We started and ended in Denmark, and visited Stockholm, Berlin, Nuremberg and Amsterdam in between. Nuremberg was the only destination that didn’t pan out: It was too hot and we got a bad AirBnB. The just-in-time travel planning did cost us some tense and stressful half-days with my partner and I checking weather forecasts and cross-referencing AirBnB and travel options. I’m not sure I recommend this planning approach, but it can work.
Trains are a good option for intra-Europe travel with kids, but sometimes you’re going to have to get on a plane. Going from Nuremberg to Amsterdam we could get neither train nor plane and had to rent a car for 24h. But even that panned out relatively well though, because we could drive along the extremely picturesque Rhine Valley.
The destinations were fine overall. Stockholm is arguably a little too similar to Copenhagen to be worth going to but the metro and public transport is extremely impressive. The way the harbor works with ferries going everywhere is also fun. Skansen was great with kids. Berlin was great with the technical museum a highlight, but not as good as Hamburg for our purposes. The main attraction of Nuremberg was the Deutsche Bahn museum but we had already gotten a pretty good dose of trains in Berlin. I was a little underwhelmed by Amsterdam. I thought it was going to be similar to Copenhagen, but there’s an order of magnitude more tourists and touts in the city center, which really ruins it. Amsterdam is famously great for bicyclists, but the pedestrian experience is not great due to narrow and obstructed sidewalks, and public transport is also a little underwhelming.
LEGOLAND, a perennial
Back in Denmark we re-visited LEGOLAND and also went to LEGO House (our kids were too young to really enjoy the latter), and also went back to Bornholm where my parents joined us. At this point we were tired but couldn’t change our flight so we spent the remaining days relaxing at a summer house in Hundested that one of my friends has. The weather was exceptional for Denmark in early September and this worked out well. We were gone for 6 weeks total.
You’re reading part of a series of posts covering all the projects I’ve done for our Lower Haight victorian house. I was going to write a post about assorted drawer and shelving projects, but it turned out that this one bedroom drawer project was big enough to warrant its own post.
The previous post on furniture covered my two projects to build beds for a hard-to-furnish room with sloping walls. The beds are on the west-facing wall. When we moved into the house, the opposite east-facing wall had low cabinets. The cabinets just opened into an empty space defined by the cabinet doors, the floor and the 45° wall. Better than nothing, but only barely. For the first couple years I think we just put empty suitcases and other infrequently used bulky items in there. I tried putting a single shelf in, but that didn’t help much and just made the lower space even harder to use efficiently.
I resolved to improve on this by getting rid of the cabinet doors and building 12 drawers instead. My vision for the outcome was that the drawers would be push-to-open with no visible handles and look like an almost seamless slab of oak drawer fronts with the grid outline of the 12 drawers only faintly visible. And I would achieve this with the cheapest Chinese push-to-open drawer slides I could find and using just a cheap circular saw with a Kreg jig. In other words, the project would require extreme precision and accuracy, but be built with crummy tools and bad drawer hardware.
As with some of the furniture projects in the previous post I conceived of this before I had begun absorbing the wisdom of woodworking YouTube. And the resulting first version was as bad as you might expect. The drawers are very wide at 36” and not very stiff so the cheap side-mounted push-to-open slides never had a chance of working well. You’d push on a drawer to try and open it, and the slide on one side (but not the other) would “open”, leaving the drawer askew. Higher-quality slides from manufacturers like BLUM have push-to-open mechanisms that link the two slides on either side of the drawer to make sure they’re both doing the same thing. But I didn’t know about such finesse before starting.
My friend Jon and I figuring out the drawer fronts. It’s an old house and nothing is plumb or level. Notice the “sheer slab” concept kinda working for the 3 leftmost drawers, although that eventually had to be abandoned.
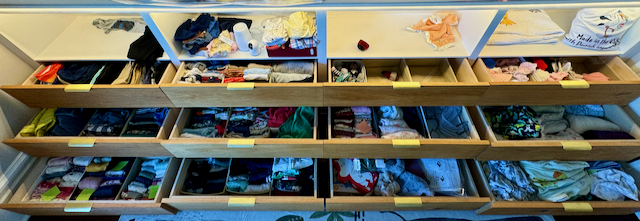
I eventually gave up on the push-to-open slides and installed normal side-mounted slides and added drawer pulls. I also had to space the drawers out more so that the fronts don’t rub and catch on one another, making the “seamless slab” not very seamless with relatively noticeable gaps between the fronts. The drawers still look fine, though, and provide huge amounts of storage space for our kids’ clothes.
Finished drawers with clothes and more for 3 kids. I’ve installed LED light strips to make it easier to see what’s going on
Some more notes:
I built the drawers from baltic birch which was excessive, but such a great material. I wish I could just build everything from baltic birch
I used 1/2” plywood for the drawer sides, but should probably used 3/4” for greater stiffness because the drawers are so large
I also used 1/2” plywood for the drawer bottoms. This doesn’t make sense in retrospect: 1/4” is almost always good enough for drawer bottoms. Thicker material for bottoms doesn’t add much rigidity, costs more and makes the drawer much heavier and harder to handle. The 36” x 24” bottom drawers are very heavy even when empty. They work great, but taking them in and out for repairs or changes is a chore
If you’re serious about building drawers you should buy a table saw, or at least a real track saw. By the time I had built all 12 drawers but before making the oak drawer fronts I caved and bought a $230 Dewalt compact job-site table saw and it’s great.
Because I built the drawers with just a circular saw, none of the sides or backs are exactly the same height. Not that it matters much.
Building drawers, especially ones mounted with side-mounted drawer slides requires a lot of precision for the width of the drawer or the slides either bind (too wide) or won’t mount (too narrow). I had to variously slim-down or shim out some of the drawers to make them work, which was very tedious
I built the drawers into the four slots where the cabinet doors previously were. This definitely saved me some detail work and painting, but I still had to spend a lot of time making walls to mount the slides on. And it also meant I had to build very wide drawers, which is not always ideal. The alternative would have been to rip out the face frames from the cabinets and build carcasses from scratch, giving me greater control over drawer width and other dimensions. This is something I find I tend to do: always improve on and build within whatever’s there, instead of tearing out and starting over. It’s probably because I’d like to have the option of going back in case whatever I’m doing doesn’t pan out.
I built 3 drawers for each of the 4 bays, yielding 12 drawers: long ones at the bottom, shorter ones at the top. And there are cubbies on top where no usable drawers could be had. The drawers are relatively deep, and one regret I have is not building 4×4 slightly shallower drawers for even more space. But not a huge regret.
This the first major drawer project I did, and I learned a lot. I’ve since built many more drawers, both using side-mounted slides and much better bottom-mounted BLUM slides. And while I’ve gotten better, I still find the process tedious and error prone. But the results are worth it.
We moved into our two-level victorian condo in Lower Haight in 2017 and I really like it. I’ve made a number of improvements and built assorted furniture for the condo in the years since. Some of these projects I’ve written about in separate posts, but I wanted to build a complete catalogue. I’m also adding a rating for each project to try and summarize the outcome and whether it was worth the effort.
This post will cover just the furniture’ish that I’ve built. I’ll follow up with more posts on other house projects.
Let me know in the comments if there are projects you’d like to see covered in a full post.
Low-profile Bed
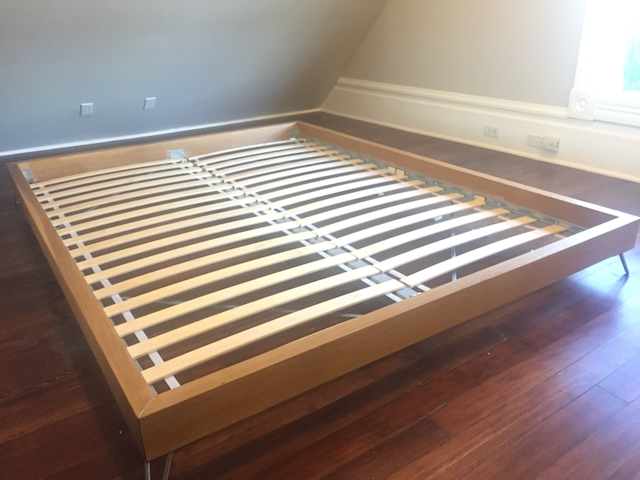
One of the upstairs bedrooms has walls that slope all the way to the floor, making it somewhat challenging to furnish. I built a queen-size bed frame from pieces of large 4” x 6” oak lumber (insert Pulp Fiction reference) with 4” hairpin legs. For the mattress supports, I used IKEA LURÖY slats resting on side-rails and tension-rods scavenged from the cheapest IKEA bed kit I could find. I’ve used the IKEA slat approach for more beds since (see below) and I think it works well.
I did this project way back in 2017 before I discovered all the great woodworking content on YouTube and it was during a period where I was obsessed with mitered corners. The result was not incredibly sophisticated, but it worked and looked just fine. The bed served as our 2nd guest bed for a couple of years before the room was converted into kids bedroom. It worked as advertised and meant we could have a queen-size bed and still have usable space in an otherwise hard-to-furnish room. The bed is currently in pieces and stored in the garage.
Rating: B. Relatively simple and effective build, but ultimately didn’t see much use.
Very low bed frame ready for mattress
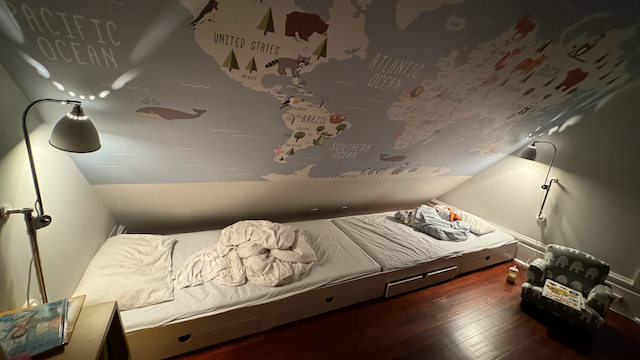
Double Bed for Kids
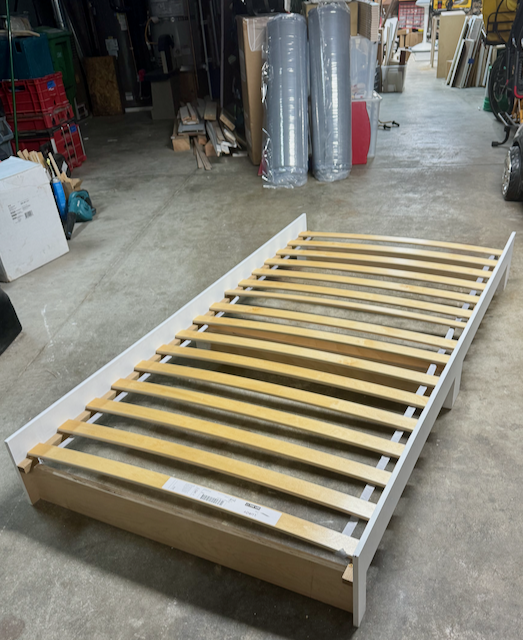
The low-profile bed was eventually replaced by a series of cribs and kids-beds. With the advent of our 3rd kid it was desirable if the two older ones (currently 2 and 4) could both sleep in that hard-to-furnish bedroom. The length of the room is almost exactly 150”, which is two twin mattresses placed end-to-end. A bunk bed is not really a good option because of the sloping ceiling. Something like the stackable IKEA UTÅKER would have been great but they add too much length to the mattress and wouldn’t have fit end-to-end.
I built two identical 75” long bed frames. The sides are made out of 1/2” plywood, and the stringers are 3/4” plywood. I only used LURÖY slats and no IKEA metal frame or tensioner. The slats rest on 1”x1” oak strips that I had left over from some other project. The strips are glued and pin-nailed to the sides. I should have made the sides from 3/4” plywood too, but at least the thin plywood made it easy to carry the beds up. The glued-on slat-rests are probably the weakest part but so far they’ve held up to the boys jumping around on the beds.
Bed frame ready to go. Note the lack of headboard to make it fit
For mattresses I went with thin IKEA ÅGOTNES. Keeping the bed+mattress height low means the beds can be close to the sloping wall/ceiling, preserving floor space. I suspect we’ll get more comfy mattresses later, but they’re currently subjected to pee and other accidents so something cheap seemed fine. And between the springy slats and the mattresses the beds are not hard at all.
The beds have four big 38” deep drawers between them. They’re very low to the floor and not the most ergonomic thing, but I suspect they’ll be used for toys and they’re fine for kids to get stuff in-and-out-of.
One realization I had laying on the finished beds is that, what I thought of as one of the smallest rooms in the house, is actually quite big—at least by floor area. It doesn’t seem big for an adult standing in the middle of the room, constrained by standing height. But it’s big if you’re not as tall or can lay down or sit in the parts with low ceilings.
Another un-planned for benefit of the bed design is that—while the boys are still small and don’t take up much room—I can comfortably sleep in the middle of the bed straddling the two mattresses whenever one of them is having a bad dream.
Rating: A. Still new, but good use of space.
Beds placed end-to-end in room.
Planters on Patio
We have a good-size roof-deck/patio. I grew up in the suburbs with lots of plants and garden stuff, so I wanted to try and re-create some of that. The patio is also pretty windy in the afternoons so I wanted to see if plants could help shield that. To that end I wanted to build really large, terraced planter boxes.
They actually ended up working and are still there 7 years on. There’s a stable of small trees and some roses, and a bunch of spring flower bulbs that always show up. The rest varies more: some years I make an effort and put in new plants, others not. During the pandemic I also grew some vegetables, including potatoes, but raccoons and other pests ate much of it.
There are lots of things I would have done differently:
Made from redwood planks: Good idea, has held up well to dirt and wet conditions. Treated on the inside with linseed oil for extra durability
Made from 1” thick redwood with no frame: Bad idea, not at all sturdy enough and can barely hold screws. I think at this point they’re more held together by force-of-habit than anything else and I’ll eventually have to re-enforce with metal brackets or similar.
Mounted on small caster wheels: Decent idea because it gets the planter off the deck so it can air out and stay dry, and because I can move the planters around to clean. Some of the wheels have now seized up though, and moving is getting harder. Should have maybe opted for bigger, hardier wheels
Inlaid water tubes for irrigation: Decent idea because it keeps the deck looking neat with just one ring of irrigation tube running around the very edge. But hard to make leak-free. Also, I thought it was important to have several “layers” of irrigation tubes at different soil depths to make sure deep roots would get water too. Spoiler: gravity can take care of that for you and I ended up having to excavate and plug those deeper water lines because they mostly just leaked out the bottom
Miter corners: Again with the miters… As anyone with any woodworking experience will probably tell you, trying to make something requiring precision from 1” softwood boards is completely futile because they bend and warp all over the place. At least I realized this after building the first box, and the other ones have saner butt-jointed corners
Rating: A. Lots of enjoyment from this one, and makes the deck feel much less sterile.
Planter on deck! I built two of these large ones, and several more smaller ones. The redwood has weathered to a nice gray over the years.
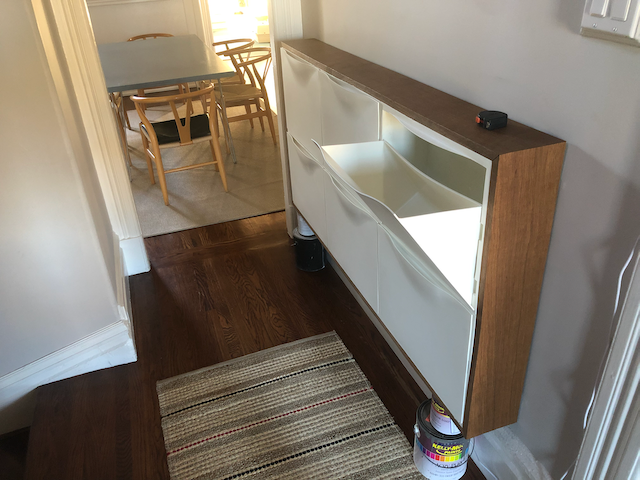
Shoe-storage cabinet in hallway
We have a narrow hallway and a desperate need for storage for shoes, sun screen, hats and other knick·knacks. So I wanted a slim storage cabinet to hang on the wall.
What I built is really just an “IKEA hack” for the plastic IKEA TRONES shoe cabinets. I put together 6 (3×2-packs) and wrapped them in 1” oak planks. I also built this in my miter-corner phase, but despite that it works well and looks pretty good. This is a piece of furniture we use every day.
Rating: A.
Shoe storage with IKEA TRONES. Paint cans are just for holding it up while mounting.
Dining Table
I actually built this originally for my apartment in Nob Hill. It’s made out of oak veneer plywood and hairpin legs, and was my first serious woodworking project. I think it was originally fully 8’ long (the length of a plywood sheet) but I had to shorten it for our new smaller condo dining room. It got some dings and scrapes when we moved so I painted it.
Rating: B. The plywood was not high quality and I almost sanded through the top ply. The sides also had voids, although I addressed that with the painting.
Dining table in original long guise in my old apartment in Nob Hill
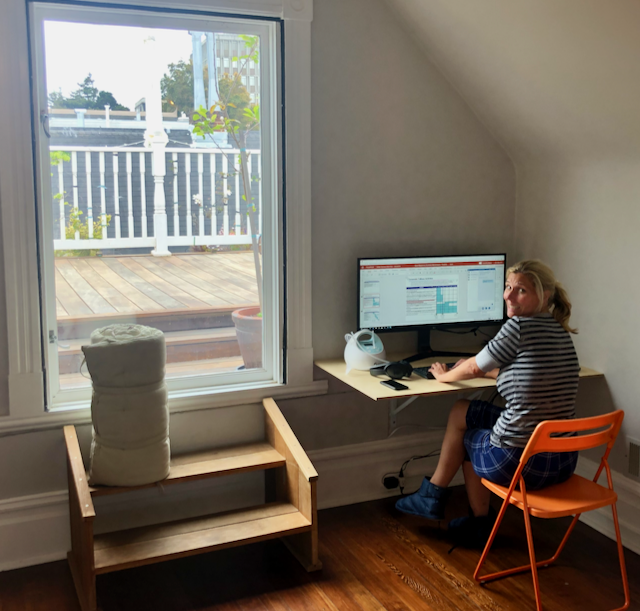
Pandemic Desks
When COVID hit we had one sort-of usable home-office desk, although we had never used it much. This was at the point where you couldn’t get anything, including anything related to home working. Luckily I had some good-size plywood pieces and giant shelf-brackets laying around, so I was able to quickly improvise a couple of solid wall-mounted desks. This desk-style is very inflexible of course, but it’s also nice because it doesn’t block floor space.
Rating: B. Temporary measure until supply chains got un-gummed and we could get height-adjustable desks.
This is the second post in a 2-part series. Read part 1 on installing an 8kW under-sink water heater in our kitchen. And if your takeaway from these posts is that I have an unhealthy obsession with heating up water then… maybe you’re right. But as laid in the Technology Connections video below, boiling water is such a foundational kitchen activity and making it fast is worth it.
Between the under sink water and our new induction range, getting water boiling in a pot for pasta is now pretty fast. But what if I want to make a cup of hot chocolate or tea? For that I’ve always used an electric kettle, and it beats an old-fashioned kettle (even on the induction stove). But coming from Europe and 3000W kettles, American 110-120V kettles are something of a let down because they top out at about 1500W. Some outlets in the US can provide up to 20A and power in excess of 2000W but I’ve never seen a US kettle that takes advantage of that.
So what to do?
Install 220-240V outlet in kitchen
Buy and ship 240V kettle from Europe
Snip euro plug off kettle cord and attach US-style plug
Boil water!
The US has a standard-size 220-240V 20A receptacle type called NEMA 6-20R. It’s like a normal 3-prong outlet, but with the prongs turned 90° to prevent accidental insertion of incompatible devices. Unfortunately you can’t get GFCI variants of those, so for kitchen applications you’re strictly speaking supposed to wire them up with a GFCI-breaker in your electrical panel. Other than that, the US 220-240V outlets fit into normal electrical boxes and install the same way. You obviously have to run a pair of wires from your electrical panel, and I ran ours when wiring for the induction range and under-sink water heater.
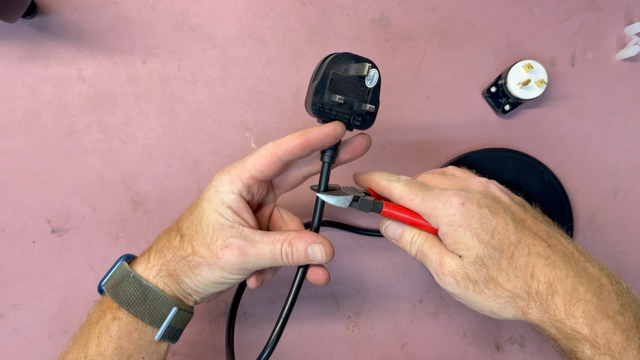
For the kettle I just went on amazon.uk and amazon.de and to find some sane-looking 3000W kettle. I opted for a Russell Hobbs one from the UK, but any kettle will work. Then wait for it to travel across the Atlantic and replace the giant UK-style plug with a US-style one from Amazon (I don’t actually know if doing that is a code violation and I’m definitely not recommending you do it, but it worked for me!).
Snipping off the UK plug
That’s all! I didn’t time the new kettle vs our old one, but going by power output it’s twice as fast which seems about right. And considering how annoying it is to wait for water to boil, the upgrade was well worth it for me.
This is the first of two posts about heating water in our kitchen. This post is about the tankless water heater I installed under our kitchen sink. The second post will cover how to make electric kettles fast in the US.
My starting point is our 130-year old San Francisco victorian house. The water heater is in the garage on the ground floor and our kitchen is on the 2nd floor. I assume the hot water pipes were retrofitted at some point, and they take a meandering route from one side of the house to the other before making their way to the kitchen, including a run on the outside of the building envelope where they’re only haphazardly insulated (I added the insulation). This meant a wait of several minutes from turning on the hot faucet to when actual hot water came out (and yes, lots of wasted water)1.
The hot water lines to different parts of the house also don’t form a “loop”, and instead branch out close to the water heater, with independent lines going to the kitchen, washer and bathrooms. With that in mind I didn’t want to install a hot water recirculation system: It would only really have helped in one place and the energy loss from hot water continuously circulating in pipes outside the house would have been severe.
Instead I chose to install an 8kW 240V Rheem tankless water heater under the kitchen sink. Since I was already running 240V 40A power lines for our new induction range, adding another set of wires for the water heater wasn’t too bad. The heater is pretty compact and fitting it under the kitchen sink was fiddly but ultimately not a problem.
Water heater installed under sink
Online reviews for these types of units are very mixed. People (understandably) are not happy if their showers are cold. But for us, in this one-sink application, the heater produces very hot water instantly. The thermostat is not even cranked up all the way and I don’t think we rely on the full 8kW. Importantly, our cold-water inlet temperature here in San Francisco is relatively high (“almost tepid” is how I’d describe it) which means the heater has less work to do. In retrospect a 30A, or maybe even 20A model, would probably have been adequate.
I plumbed the water heater to the cold water line and capped off the hot water line under the sink rather than putting the tankless heater inline with the hot water from the garage. It takes so long for the garage hot water to make it to the kitchen that I don’t think there’s anything to be gained from letting the garage hot water “take over” from the tankless heater when the hot faucet runs for a while.
I also plumbed our dishwasher to the tankless water heater. As predicted by another Technology Connections episode this has significantly improved cleaning performance. That’s because, for its initial pre-wash rinse, the dishwasher doesn’t use its heater and just hopes that it’s supplied with hot water. That is now actually the case, making the initial rinse much more effective.
Overall I’m very happy with this little water heater. Having instant hot water for washing hands and rinsing dishes seems like a bedrock of modern civilization but we were without it since moving here in 2017. If you can make the required 240V high-current electrical circuit happen and maybe also if your cold water inlet temperature is not too low then I think under-sink tankless water heaters are a no-brainer for solving the problem of having to wait for hot water.
I would love to travel back in time and relive the scene when the hot water system was originally installed in our house. I imagine the plumber and the then condo owners standing in the kitchen after the work was complete, turning on the hot water and then waiting in eager anticipation for several long minutes for the water to start turning hot. Did they then pop a bottle of champagne? Did anyone comment on whether waiting this long was actually practical when doing common kitchen tasks? We’ll never know. ↩︎
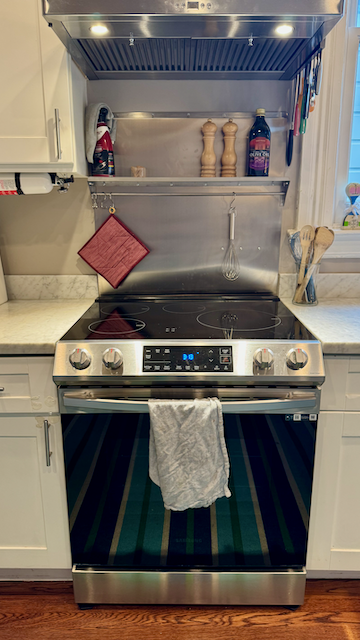
We recently replaced our gas range with an induction one and it’s lot better. My main motivation was energy savings (we have solar, so electricity is “free”) and improved indoor climate. I don’t want to get into the whole gas-stove culture war and I’m personally open to the possibility that burning gas inside may not be all that harmful. But all else being equal, there’s no way a gas stove improves indoor air quality and given the other benefits it seemed like a good idea to make the switch.
Induction FTW
I had two requirements when shopping for the induction range:
Controls on the front so you don’t have to reach over boiling pots and pans to adjust the burners
Actual hardware knobs so you don’t have to fiddle with a touch interface embedded in the cooking surface
The cheapest model to fit those criteria was a $900 (at time of purchase) Samsung model (Best Buy link). The fastest burner can boost to 3200W which is decent but not outstanding. I’ve been tracking Impulse Labs which has battery-boosted 10kW burners but is currently only a cooktop and not actually shipping yet. Other ranges were slightly more powerful but also at least 3x the cost and so not worth it. I also did consider an upgrade option from Samsung with a dehydrator, but it was $600 more and I’m pretty sure I’m never in my lifetime going to dehydrate $600 worth of stuff.
The Samsung replaced a $5000 stainless steel 4-burner Thermador Professional. These kinds of stoves are an artifact of the inflated San Francisco property market: When condos and houses are put up for sale they’re given a lick of paint, some marble countertops and a flashy new stove that looks impressive for the open house. They’re not actually good for home use though: All four burners are the same size and huge, so that anything but our largest pan had flames licking up the sides, even at moderate power settings.
Figuring out the electrical wiring was fiddly, but doing it myself at least meant that I knew everything was going to plug in and work. If you read online induction range reviews and installation experiences you’ll see that many folks end up with the wrong kind of outlet or an outlet installed in a way where the big 40A 240V plugs with stiff power cords don’t plug in.
It’s now been a couple of months and it’s astounding just how much better the induction range is. I was expecting the cooking experience to be about similar or even for the induction range to be somewhat slower, but that’s not the case at all. I didn’t time the gas range, but I’m pretty sure the induction range boils water and heats up pans faster just because it puts the heat into the pot/pan instead of blasting most of it up the sides and into the rest of the kitchen.
And the ancillary benefits are many:
The flat ceramic cooktop is so much easier to clean and you don’t have to manhandle cast iron inserts to do so
Handles of pans and cooking utensils don’t get super hot from gas flames. You can lift pots off the range without using oven mitts or a tea towel
The cooktop doesn’t get hot except for the area right under the pot, so less scary to have kids help stir
When not in use, the flat cooktop is much more useful for setting down grocery bags and other stuff
The oven is much larger and you can place two cooking sheets side-by-side. There’s even a storage drawer below the oven
Overall, it’s just so nice that cooking is no longer a flaming, sputtering inferno, and that it’s still fast.
The only thing that was nicer on the flashy gas range was that the oven racks ran on smooth roller bearing slides (the Samsung has crude grooves in the oven wall). The Samsung also comes with a digital clock which is not a pro because, like all appliance clocks, it’s invariably wrong. Amazingly the Samsung range actually connects to the internet and you can even use an app to set the clock, but it cannot sync automatically over NTP.
Except for our cast iron pans (which we frankly don’t use much) we had to get new pots and pans. And I had to install a stainless steel backsplash to cover an un-painted patch of wall, but that proved a boon because the backsplash has a shelf and hooks for hanging utensils.
Overall, if you can make the wiring and power work and you have the option, I heartily recommend switching from gas to induction, even if you go for a cheap induction range like we did.
The blog you’re reading is hosted on a server that sits on the floor in a closet in our condo in San Francisco. You’re accessing it over my very pedestrian home internet connection (bizarrely, getting fast residential internet in San Francisco is hard). I don’t have a static IP address so DNS is resolved using Dynamic DNS (DDNS) and DNS records are updated whenever my ISP changes the external IP address. There’s no redundancy and power for the server has no battery backup. Some software update tasks are automated, but many I only do whenever I happen to log onto the server for one reason or another. There’s no fancy container orchestration, just Docker containers running with the --restart unless-stopped flag.
By all rights, uptime and availability for the blog should be horrendous. It should have been pwned by script kiddies many times over. The assorted software pieces should error or fail regularly.
But that’s not what actually happens. Uptime for the server is typically measured in months with the only interruptions happening when I flip the breaker to do electrical work on the house, or similar.
I reflected on this because of 37signals’ recent ONCE announcement where you buy and pay for their software once (as it were) and own a license to use it on your own hardware in perpetuity, instead of buying a subscription for a SaaS-hosted version. Some of the pushback on Twitter emphasized how SaaS is a better model because self-hosting software exposed to the public internet is uniquely difficult and scary. I’m not saying it’s easy, but I also don’t think it’s actually that hard and I can see how it’s a refreshing alternative to straight-jacket SaaS models with ever-increasing subscription prices.
This weekend I installed a Tesla Wall Connector and a Neurio W2 Power Meter and configured them for dynamic load management. Dynamic load management means that the EV charger will dial down the charge rate from 48A whenever the power meter detects that total load is close to the maximum load of the electrical service to the house. For houses like ours with 100A (or smaller) electrical connections that’s very convenient because we can charge our EV quickly without tripping the main breaker in the few brief instances where we’re both charging our car and running all the other electrical loads in the house.
You obviously should never do what I did and should always hire a licensed electrician and Tesla installer.
Breaker, electrical wire (eg. 6/2 or similar THHN if you’re using conduit) and other stuff for wiring the wall connector.
Installation
Install the Neurio Power Meter. There’s a good how-to video on YouTube. It’s unclear to me if the WiFi connection is required when paired with a Tesla Wall Connector but I added the antenna for good measure. The main challenge for me at this stage was finding a spot in our already busy electrical panel and fiddling with cables for CT clamps and so on.
Install the Wall Connector. Ours is installed right below our electrical panel with the power wire coming from behind.
Connect power meter and wall connector. I chose to drill a separate hole in the wall connector back-plate for the power meter comms cable instead of trying to run it with the power wires, mostly because the comms cable isn’t very long and that way I didn’t have to mess with trying to extend it. The Wall Connector has an elegant design where the power wires all attach to the back plate and then the face plate just slots on. Unfortunately the comms-port is not part of that scheme and is on the face-plate assembly. So you have to connect the power meter comms wires while balancing the face-plate and then secure the whole thing to the back-plate.
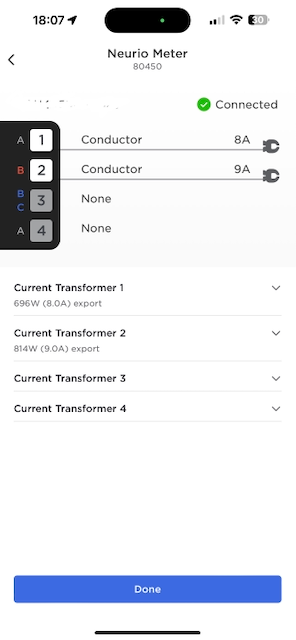
Initialize the Wall Connector. You can do this using the Tesla One app. The app is supposedly only for Tesla employees and 3rd party contractors but you can log in using a normal retail Tesla user account just fine. When you scan the QR code that’s on the Neurio power meter it starts showing up as part of the install and you can configure the CT clamps. Check if you need to “flip” them to ensure the meter registers power flowing in the right direction (“import” vs. “export”). At this stage you can also configure the max load where you want EV charging to start dialing down. Note that I didn’t configure the Neurio separately, it was all through the Tesla app.
Tesla Wall Connector back-plate with power and comms cablesTesla One app screenshot, configuring when charging should be limitedTesla One app screenshot, configuring the CT clamps on the Neurio W2. Note that the clamps are not yet “flipped”.
Summary
We took delivery of our Tesla a couple months ago and the power meter works great and we’ve had no main breaker trips for our 100A service.
We haven’t taken delivery of our Tesla car yet so I haven’t actually tested the dynamic load management. But I wanted to document this process since it does seem to work and the power meter registers with the Tesla app and site install and appears to be recognized. I’ll update this post when I’ve confirmed the setup works and throttles charging when we’re using all of our other appliances.