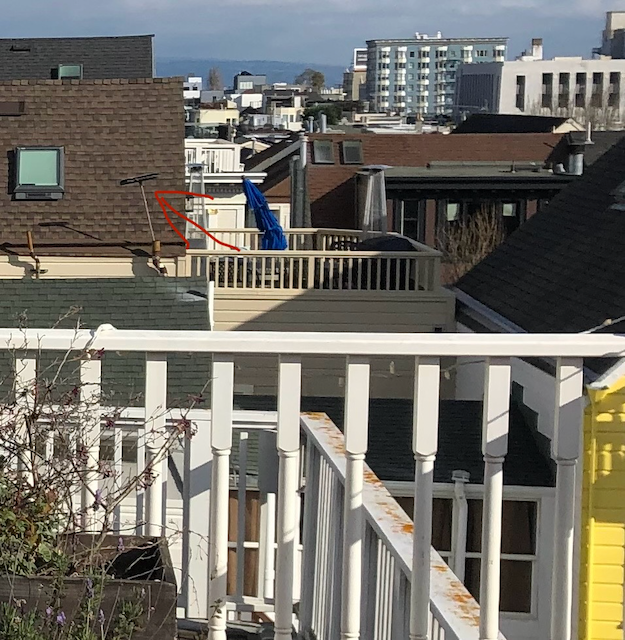
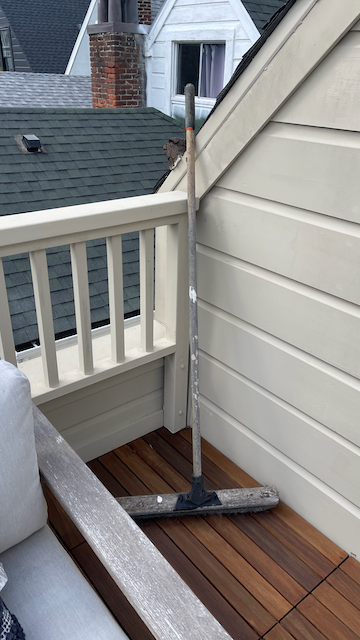
This is very exciting to me: For years a broom has been stashed in drain vent on the side of one of our neighbors’ house (a couple houses over). The house is currently on the market so I went to the open house, made polite conversation with the real estate agents and then proceeded up to the patio and took the broom out of the vent and put it on the deck.
I don’t fault the folks that used to live there for storing the broom in the vent. For them it was probably a convenient and out-of-the-way place to stash a bulky and infrequently-used implement. But for me, every time I gazed out over the San Francisco Bay from our patio my view was marred by an upside-down broom sticking out of a vent at an odd angle.
Last winter I collected signatures from residents of our San Francisco block (on Waller St. in Lower Haight) to petition for SFMTA Traffic Calming. If successful, the petition will likely result in speed bumps or bulb-outs being put in. If you live in the neighborhood, Scott St. between Waller and Duboce is a good example of a traffic-calmed block.
I really love our little patch of San Francisco in Lower Haight / Duboce Triangle: It’s where I first moved to in San Francisco in 2011 and except for a couple of years in Nob Hill, I’ve lived in the general area ever since. I also care about biking and bicycle infrastructure, and streets being safe for our kids. Our block is right off The Wiggle, after it makes a turn. The city has done an OK job traffic-calming The Wiggle itself, but our block is straight and wide and some drivers tend to zoom through. It’s not the most dangerous block in San Francisco by any measure, but it’s not great either.
Traffic Calming is different from the “Slow Streets” program that the city made happen as part of the pandemic response. I didn’t appreciate it at the time, but Slow Streets is a fascinating phenomenon. Most San Francisco public works, including Traffic Calming, takes ages to get done, and has to go through multiple rounds of public consultation and deliberation. Slow Streets didn’t follow that process: the city of San Francisco more or less just decreed them into existence and that was that.
I initially tried to figure out if our street block could get the Slow Streets treatment. But there’s no bottoms-up process for that, and with the amount of controversy generated by existing Slow Streets I’m not sure SFMTA is going to try for more.
Collecting Signatures
Collecting the 20 signatures for the petition was a good experience. It was great to have a reason to just ring everyone’s doorbell, introduce myself and chat about the neighborhood (in fact maybe I should have just done that when we moved in years ago). I learned a bunch about who my neighbors are, how long they’ve lived here and lots of random bits of neighborhood history.
When it came to the traffic calming petition, almost everyone I spoke with were willing to sign. One or two thought that speed bumps or bulb-outs were too big a change and suggested just installing more signage. I empathize with that view but studies have shown that car drivers tend to adjust their speed according to the layout of the road, not to the speed limit or other sign-posted advisories: On roads that are straight and wide they go fast and on roads that are narrow, windy or have bumps they go slower. And one or two others didn’t favor any changes at all.
One interesting takeaway for me was that several neighbors that signed after more detailed discussion identified traffic calming and the petition with pro-bike efforts and expressed concerns about bicyclists impact on pedestrian safety. That’s surprising since Traffic Calming is not about adding more bike infrastructure and should improve safety for everyone, including motorists. One of my neighbors used as an example the time that the Waller and Pierce intersection was closed (to raise the road in the intersection if I recall). In his experience bicyclist following the Wiggle didn’t dismount and instead just rode on the sidewalk to get around the road closure, endangering pedestrians.
Biking on the sidewalk is wrong and illegal but in my opinion the danger posed by inconsiderate bicyclists is something of a red herring. After all, motorists reliably manage to kill around 30 people per year in San Francisco alone. The only case that I know of where a bicyclist killed someone is a much-publicized 2012 incident in the Castro. Even so, getting the feedback from my neighbors that they find bicyclists occasionally inconsiderate did make me more aware of how bikes are perceived in traffic and I’m now trying to be even more considerate when I bike around the neighborhood.
Moving Forward
The petition is currently in process with SFMTA. If you live on our block you may have noticed black pneumatic tubes temporarily draped across the street a couple of months ago. Those were for SFMTA to collect data on vehicle volume and speed and they’re working on processing that now. We’ll whether our block meets the criteria this fall, and I’ll keep everyone posted.
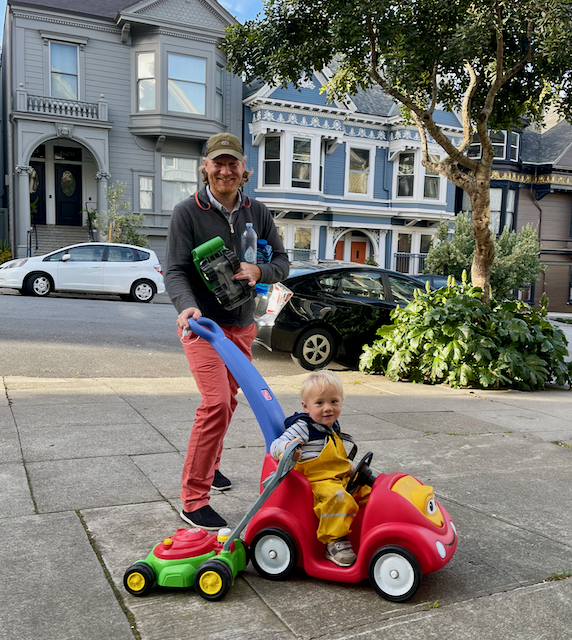
This post details how I replaced the noisy plastic wheels on a Little Tikes push car with high-quality rubber-coated steel wheels. The default wheels are probably OK for grass but on pavement they make a deafening grinding noise and I felt bad for my neighbors (and my son) just going one block over to the park behind our house.
To be clear, upgrading the wheels doesn’t make economic sense: A push car with noisy wheels costs $60 and the “whisper ride” model with rubber-coated wheels costs $80. Four steel wheels will set you back about $40 before considering time and additional parts. But we were emotionally attached to our push car and I thought it’d be a fun project.
Assuming your wheels have 1/2″ ID ball bearings and the axle rod on the push-car is 3/8″ you need 3/8″ ID x 1/2″ OD metal sleeves of some kind. These are not strictly required but the wheels wobble without them
3/8″ push nuts (you may be able to re-use the ones that come one the car if you take them off carefully)
Steps:
Yank the axle-rods off the bottom of the car. The axles snap into the bottom of the molded plastic car body
Get the push nuts off the axle ends and take the old wheels off
Press the 3/8″ x 1/2″ sleeves on the axle ends. This may require some combination of sanding, lubrication and hammering
Mount the new wheels on the sleeves on the axles and put the whole thing back together.
Smoothest-running push-car west of the Mississippi!
UPDATE: As of December 2023 it appears that the HomeBridge plugin is no longer working, possibly because MrCOOL added additional CAPTCHAs or other validation when logging in.
Last year I installed a DIY 4-zone MRCOOL mini-split in our condo. Once I got the system running I wanted to control it through Apple HomeKit. Unfortunately MRCOOL only integrates with Amazon Alexa and Google Home.
I already run HomeBridge to tie together some of our home automation and a supposedly MRCOOL-compatible plugin was available. The plugin is called “smart-cielo” because many mini-split systems on the market share components but are sold under different brands in different configurations, “Cielo” being one.
Until recently the HomeBrdige plugin didn’t actually work with my particular system, but that’s now fixed!
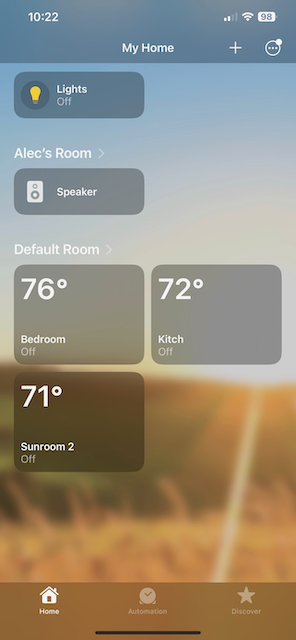
3 head-units controllable from Home app
From memory, here’s a rough guide to using a MRCOOL mini-split with Apple HomeKit and HomeBridge.
Prerequisites:
MRCOOL mini-split with WiFi smart controllers setup and working and you can control your mini-splits from the MRCOOL iOS app
HomeBridge running and working with HomeKit Home Hub. I run HomeBridge in a Docker container on a server in our home, but any HomeBridge setup will work
The network MAC address of each mini-split head unit wifi controller. You can find the MAC addresses in the MRCOOL app or in the admin interface of your WiFi router
Configure the plugin with the username (email address) and password used in the MRCOOL app (this is the password used with the HTTP API that the plugin interacts with to control the head units)
Plug in the MAC address for each head unit in the plugin setttings
Check that it works!
Alternatives
Before the HomeBridge plugin became available I researched and experimented with a couple of other options for integrating “dumb” mini-splits into smart home setups. My notes might be useful is you’re reading this and don’t want to get into HomeBridge. The least broken option I found is the Sensibo Air, and I bought two. They do work (by sending infra-red signals to the head-unit like the normal MRCOOL remote). But overall I think the Sensibos are way overpriced for what they do, and I don’t recommend them. I also remember being annoyed by the requirement for a monthly subscription to access more advanced features.
The best alternative to a HomeBridge HomeKit setup is probably to just stick with the MRCOOL app. It’s clunky and the automation options are simplistic, but once my excitement about HomeKit integration dissipated I found it to be mostly good enough. The reason is probably that the mini-splits are per-room, so getting up and using the remote control is easy. Unlike the whole-house furnace that could only be controlled from the hallway thermostat (before installing an ecobee).
The National Outdoor Leadership School (NOLS) is an American outfit that runs skills-based wilderness courses all over the world. You can take courses for college credit, to pick up outdoor skills like sailing, mountaineering, climbing or backcountry skiing, or simply to have a good time in nature. At the time of writing I’ve done two courses:
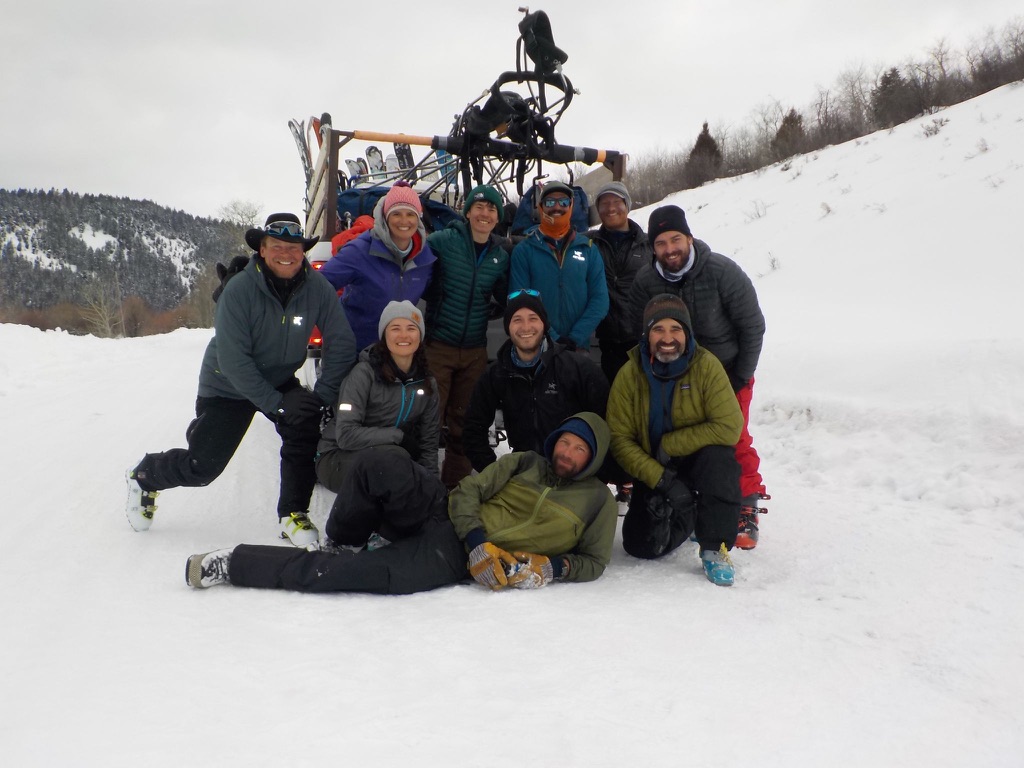
2020 Winter Backcountry Touring in the Tetons in Idaho and Wyoming. This involves a couple days of resort-skiing (to get everyone at least basic skiing skills) and class-room avalanche instruction and equipment prep. The rest of the course is in the backcountry, first a couple days in a yurt and the rest camping in snow dugouts (quinzhees). Quite a lot of time is taken up just learning to survive, and with level 1 AIARE avalanche qualification, but there’s also amble time for backcountry skiing.
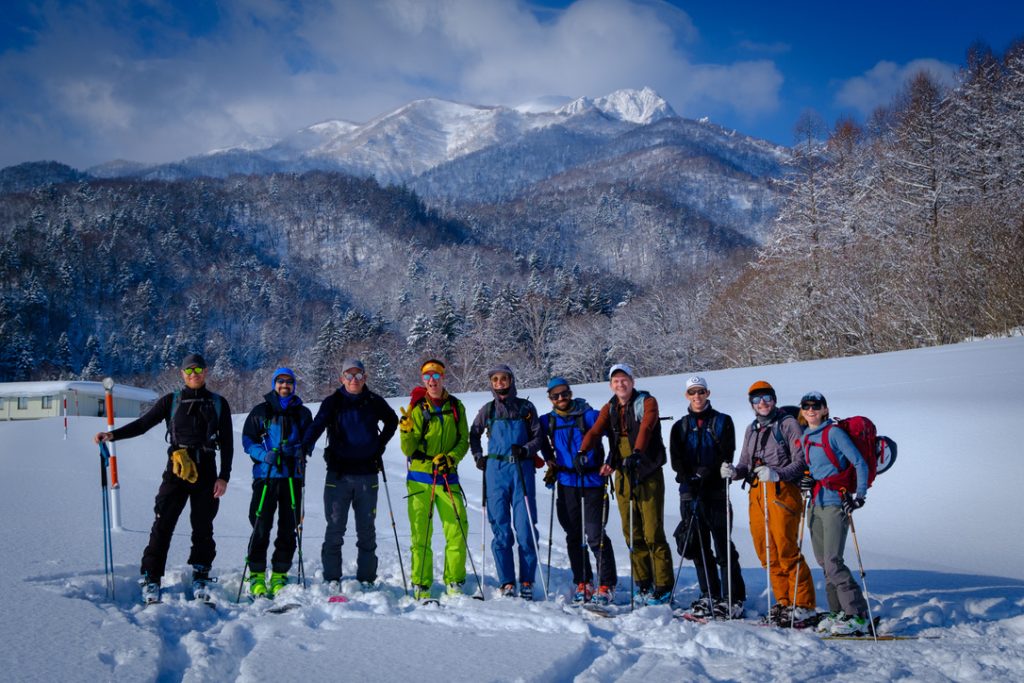
2023 Alumni Japan Powder Skiing on Hokkaido. This was the first year for this trip (although I was on the 2nd team to go that year). Alumni trips are less focused on instruction and qualification and more on plain fun. So we slept in actual beds (or on tatami mats at least), staying 3 different places on the island of Hokkaido and driving around to backcountry ski spots that the instructors had staked out. And lots of time soaking in onsen natural hot springs after long days skiing.
I really enjoyed both (very different) experiences and would recommend NOLS to anyone interested in surviving and thriving in the great outdoors.
Hokkaido. Photo by Jonathan Mowlavi
I learned of NOLS from reading Chris Hadfield’s (the Canadian commander of the International Space Station) book “An Astronaut’s Guide to Life on Earth”. Chris participated in multiple NOLS courses to prepare for his stint on the ISS. His thinking is that the experiences are similar: You team up with a group of people you’ve never met before in an unfamiliar environment (the Utah desert, Low Earth Orbit) and you have to immediately figure out how to work together and solve problems. He also describes how he found aspects of NOLS’ ethos such as “expeditionary behavior” useful for coping with life in space (and on Earth). “Expeditionary behavior” can be bluntly summed up as “always put the group before yourself and never complain or whine unless your problem is a risk to the success of the group”.
In NOLS, opportunities for personal and leadership development are not based on contrived hardship. Eg. there’s no Bear-Grylls-like challenges involving long pointless marches without supplies (although talking to folks that participated in courses in past decades, fasting was sometimes encouraged). You get plenty of food and work with instructors to make sure you’re bringing all the equipment you need to succeed. Instead, opportunities for development come up when learning new skills, when working together as a team and are offered by the vicissitudes of nature itself.
The ethos of NOLS is hard to pin down and having participated in just two courses I don’t claim to have a deep understanding, but here’s my impression: On one hand, inclusivity and personal reflection are important. Students are encouraged to share their feelings and appreciation for one another, there are daily “readings” of poems and other texts that are then discussed in the group and everyone shares impressions and highlights of the day (the way I’m wired, I always have to get over myself to embrace stuff like that with a group of strangers, but it really does make for a much better experience). But NOLS also embodies a flinty hardness. Nature can be unforgiving, and NOLS wants students to be mentally and physically prepared to deal with the ups and downs of outdoor life. NOLS was founded by Paul Petzoldt who served with the 10th Mountain Division in Italy in WW2 and NOLS works closely with the US Military to provide training to both active duty personnel and veterans. That somehow shines through in regular courses too. The group that had gone before us on the Winter Touring expedition in the Tetons was comprised of Navy SEALS, and they reportedly found it to be tough going which caused some amount of trepidation in our group.
NOLS courses have also been a great way to get to know people that—like me—love being outdoors in winter. As an example, the packing list for the Winter Backcountry Touring trip does not include toilet paper, and you instead do your business by digging a hole in the snow and wiping with snowballs upon completion. What I’m trying to say is that folks that sign up for NOLS courses are typically willing to go the extra mile to have great experiences in life and turn out to be great expedition partners with lots of fun stories to share. I am mindful that NOLS also ends up selecting for students that are like me in less interesting ways, that is white and relatively well off (courses are not cheap, although still a bargain in my opinion). NOLS is working hard to try and change that, but there is clearly a long way to go.
The NOLS instructors on the courses I’ve been on are of a breed apart. I can recognize aspects of my own life arc in them, but for all of them they seemingly decided that being outdoors and sharing their love of nature with others was as-or-more important than office jobs or traditional careers. Some of them have—over decades of NOLS instructing—literally spent half their time “in the field”: sleeping in tents, snow-caves, under tarps or just under the stars. All the NOLS instructors I’ve met are highly educated, knowledgable, resourceful and extremely high energy. NOLS is the only place I know where you’ll find a Rhodes scholar helping you adjust your skis, while unironically holding forth on the spiritual importance of skiing deep powder snow.
Looking a little scruffy at the end of the Teton course
In case you didn’t know, wall outlets with USB ports are a thing. They’re neat for a couple reasons:
Cleaner look, no wall-wart chargers hanging off the wall or falling out the socket
Always there and don’t disappear because someone has to quickly pack for a business trip
110V receptacles can be used for other things that USB-chargers
When we moved in 2017 I installed outlets with USB-A ports in a couple of strategic locations and really liked them. The most-used locations are the kitchen and hallway where we tend to charge phones, bike-lights and so on.
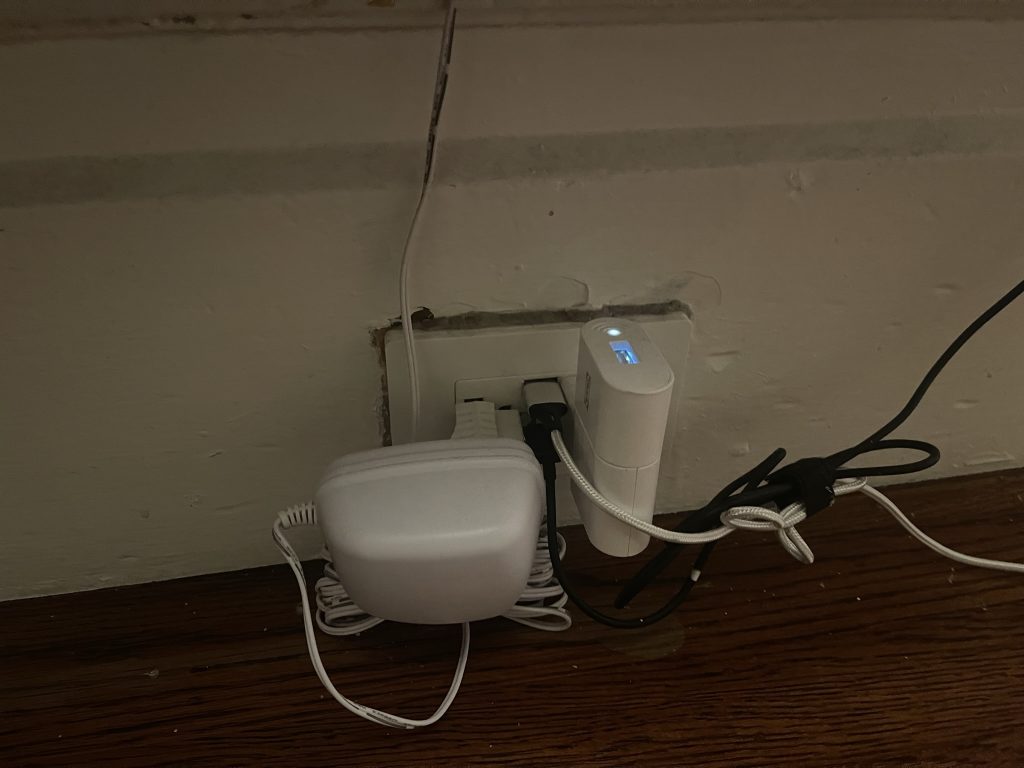
This hallway outlet powers baby-monitor charger, dual Qi charger for AirPods, an IKEA ZigBee repeater and the house thermostat. The ZigBee repeater could probably be in a USB port.
I also installed an outlet with USB-ports behind our bed headboard to charge phones at night. This works fine, but in retrospect was it also relatively pointless: There’s already power strip behind the headboard to power reading lights and other stuff so the USB outlet doesn’t make it any cleaner or more convenient than a wall-wart in the power strip.
12W USB-A type outlets were fine for 2017: USB-C wasn’t all that common (at least not for charging phones and tablets) and you couldn’t get outlets with high-power PD type USB-C ports anyway. That left me without an elegant way to charge our USB-C/Thunderbolt-port laptops. Without having done any research, my understanding is that Ultrabook-style Windows laptops generally require at least 45W to charge, and can typically accept higher charge rates. Way more than what comes out of the USB-A ports.
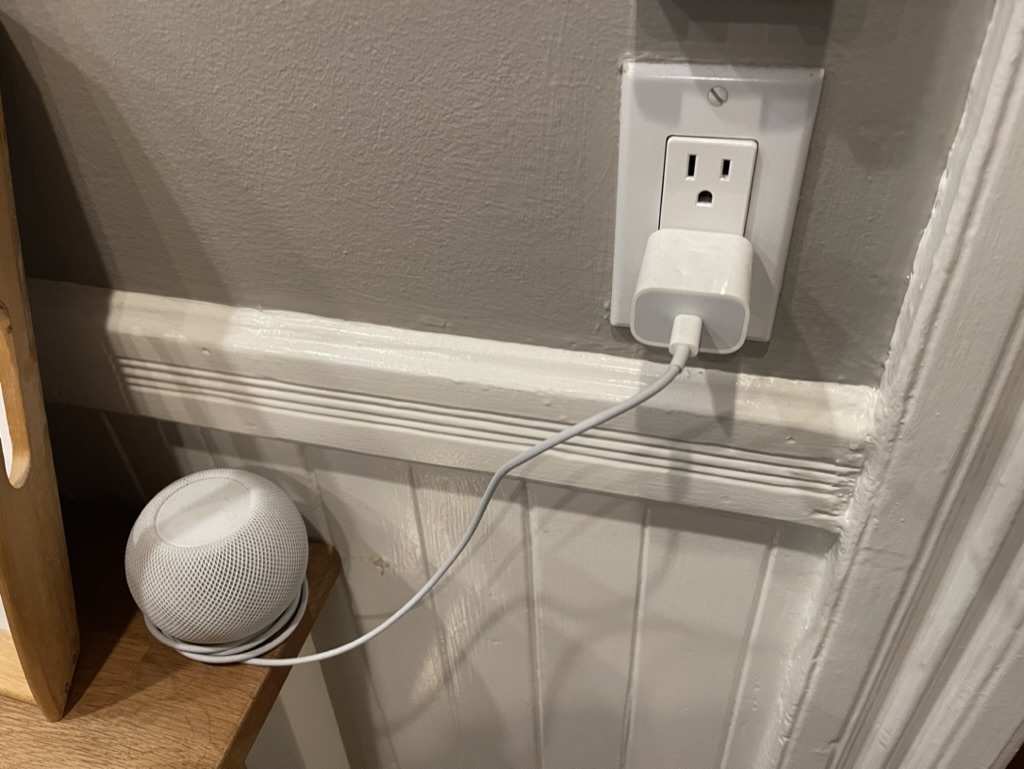
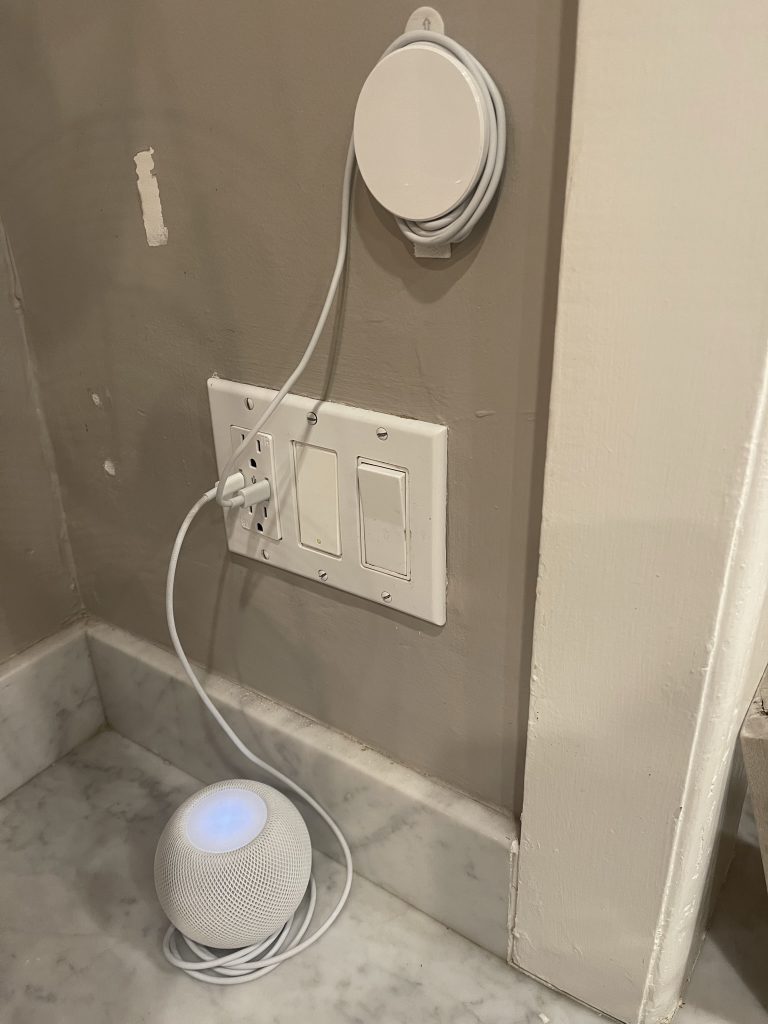
Laptop charging around the house became less of a problem with the pandemic because both my partner and I now haw full-featured home desk setups that we plug into, but a new one cropped up: HomePod Minis. These are in plain sight in our kitchen and I never really liked the look of the 20W wall-wart with a wire snaking down to the inevitable coil around the base of the speaker. HomePod Minis originally required the full output of the included 20W charger, but a software update dialed that down to 18W—still too much for USB-A outlets.
Not a good look
I’ve periodically checked for outlets with higher-power USB-C ports, and they finally starting showing up this past year. I was slightly annoyed it took so long since it’s an obvious improvement and 3rd party wall-wart manufacturers like Anker were perfectly capable of churning out GAN-based chargers that would fit within the envelope of a standard US wall receptacle. I guess safety regulations, heat-dissipation and reliability requirements combine to make designing a wall-plug receptacle integrating high-power USB-C ports harder than it seems.
Regardless, we’re now spoiled for choice and you can get outlets with (at the time of writing) up to 60W single-port output, enough to charge even relatively powerful laptops. When deciding which ones to get, I was tempted to spring for the most powerful (and expensive) option, also because installing outlets involves turning off electrical breakers and is generally annoying and not something I’d want to do again later to upgrade. But I ended up going for a much cheaper dual USB-C ELEGRP model with 36W max output (18W per port) that I can’t find on Amazon anymore.
Much better. Above the outlet is an off-brand “MagSafe compatible” charger.
I chose those partly because they’re powerful enough to power our HomePod Minis and high-output MagSafe chargers, and partly because I’ve largely switched to Apple Silicon Laptops that have much lower power draw. In fact, both my M2 MacBook Air and (work) M1 MacBook Pro can charge (albeit very slowly) off the old USB-A style outlets (I’m sure someone’s going to point out in the comments that one should only use a proper Mac charger and that I’m ruining my laptop batteries and so on, but I’m going to go ahead and assume that whoever designed the charge controller chose to add support for those charging speeds because it’s safe).
So there you have it: Wall outlets with integrated USB charging ports are awesome and are now powerful enough to power small speakers and even laptops, in addition to charging phones and tablets. And outlets with built-in USB ports look much cleaner than wall-warts that fall out, go missing and take up an outlet.
For the past year and change I used a 32GB non-pro 7th/8th generation iPad for almost all of my personal computing needs. The setup worked really well and I’ve come to really like the device. This somewhat surprised me since I love fast computers and big monitors. So here’s a review of my experiences.
Before the iPad I used a Lenovo X1 Tablet 3rd Gen which is a wonderful device too: very fast (I had the fastest i7-8650U processor), dual Thunderbolt ports and an outstanding 3:2 aspect-ratio high-res screen. Unfortunately it mysteriously stopped working in the summer of 2020 right after the warranty expired.
New M1 MacBooks were expected that fall and since I’ve been drifting into the Apple ecosystem over the past decade I decided to wait to buy a replacement for the ThinkPad and use the iPad to tide me over me over for a couple months (it was a work-gift we had laying around). The first M1 MacBooks came out in November ‘20, but I was somehow underwhelmed—I don’t remember exactly why—maybe something with the limited external monitor support. So I decided to hold out for the follow-up M1-CPU MacBook Pros and the iPad soldiered on. The new MacBook Pros turned out to be super expensive so this winter I ordered what I should have gotten when they came out: a standard M1 MacBook Air.
Ultimately I think I’ll look back on this iPad-period as a Walden-Pond-kinda time where I successfully limited myself to a really constraining computing device, learned some things and then returned to using more powerful and ultimately more productive computers.
Hardware
First off: the base iPad model is a great device. I almost always use it with an Apple Smart Keyboard attached. The Smart Keyboard compares poorly with a ThinkPad keyboard but it’s surprisingly useful and I can type pretty quickly in relative comfort. The big drawbacks are lack of backlighting and the need for a stable typing surface (i.e. no good reclining on couch). If I was going to continue to use the iPad as my main device I’d try out the Logitech Combo Touch.
Some aspects of using multiple keyboard layouts (Danish and US in my case) and the interaction with keyboard shortcuts is not really thought through. For example the Safari tab-cycling shortcuts are cmd+shift+[ and cmd+shift+] which is fine on the US layout. It doesn’t make sense for the Danish one though, and there’s no keyboard shortcut for changing the layout. The workaround if I’m stuck on the Danish layout and want to switch Safari tabs requires clicking the Safari address bar (bringing up they on-screen keyboard controls), selecting US keyboard layout and then cycling through tabs. Not great.
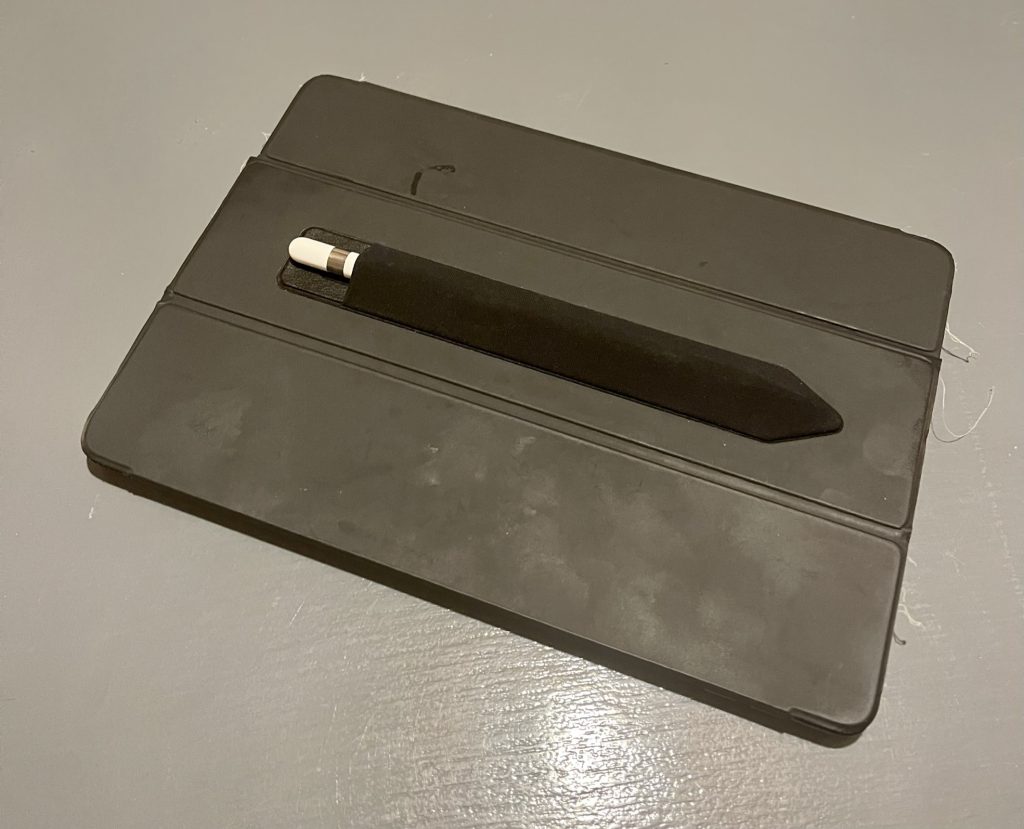
I got a 1st generation Apple Pencil for good measure, just to see how much utility I could get with a full complement of input devices. Besides a few home DIY projects sketches I use the pencil to draw with my 2-year old son, and it’s great for that. No paper, no mess, easy storing and cataloging of drawings. We draw together in the Notes app, but I’d like to learn ProCreate. The pencil is also a nice alternative to finger input because it keeps smudges off the screen. I use a pencil-holder attached to the keyboard cover to hold the non-magnetic 1st gen pencil, which works well.
iPad with Smart Keyboard and Pencil
The hardware design for the standard iPad feels dated. It’s not much changed from the very first iPad: Home button, big bezels, curved back. The 10.2” screen is small, but fine for single-window use in landscape mode. The USB 2 interface on the Lightning port also feels incredibly dated and it makes moving files using flash drives or local 1Gbs networking a drag.
The two worst aspects of the 7th/8th generation iPads were both fixed in the new 9th generation model (which I haven’t tried): The poor front-facing FaceTime camera and the cramped 32GB base storage model. I never take FaceTime calls (with my parents, for example, for them to talk to their grandson) on the iPad even though it has a bigger screen than my iPhone — the camera is just too crummy. For comparison I gifted my parents an iPad Pro, primarily to get them the Center Stage FaceTime feature, and it’s great.
The 32GB storage situation is manageable, if annoying. The problem is not that I have 32GB worth of apps, it’s that Photos hoovers up any residual storage with cached images from my iCloud photo library. I wish there was a way to make Photos more aggressively offload images to free up device storage, or set a limit to the amount of device storage used by the Photos app.
Battery life is pretty OK and certainly better than Windows laptops. On weekends (when I tend to use the iPad a lot) I have to stay on top of charging at night or it’ll run low. Being used to newer iPhones, one thing to note is the lack of fast-charging: Trying to quickly top up the battery with a 30min charge doesn’t make a difference, the iPad has to more-or-less soak up a charge overnight.
iPadOS 15
I got onto the iPadOS 15 public betas as soon as they became available and I suspect that contributed to my positive experience (I never really used an iPad in earnest before, so can’t compare with earlier iPadOS versions). While the iPad screen is too small for actual multi-window use, the improved keyboard shortcuts and widget support probably helped make the iPad a more tenable laptop replacement.
Speaking of keyboard shortcuts, one thing that still bugs me is the semantics of cmd+tab on iPadOS. Coming from full desktop operating systems I have deep muscle memory and always use alt+tab/win+tab/cmd+tab to switch between currently open apps. On iPadOS, however, cmd+tab doesn’t go through “currently open apps”, instead it is apps that the OS hasn’t swapped out for one reason or another. This seems arbitrary and, dare I say, un-Apple-like. A more charitable interpretation is that the cmd+tab app list is “apps that you can switch to really fast” (i.e. without the app having to swap back in) but even that is not really satisfactory: I don’t alt-tab around to find an app I can get going really quickly, I alt-tab to get to some app that I was using a minute ago and now need to use again, whether I have to wait for it to swap in or not.
The upshot is that I tend to use Spotlight search when switching apps which is not lightning-fast, but fine. The 🌐+⬆️ app switcher is also “fine” but not great for keyboard only use, partly because the default focus is on the upper-left corner app, which comes to what I was doing 6 apps back. I’m trying to make myself use 🌐+⬅️/➡️ which is actually fast (until you get to an app that has to swap in). It doesn’t give you an immediate overview of the list of apps you’re tab’ing through though, instead you’re just stumbling along, hoping that the next keypress produces the app you want.
I guess the ultimate cause of this difference is the auto-app-closing behavior in iPadOS. The equivalent in “normal” operating systems is memory being paged to disk, which seems to result in a more seamless user experience, but maybe I just haven’t used a low-memory Windows machine in a long time and it turns out that the iPadOS behavior of almost-fully closing apps that no longer fit in memory is the optimal one (also for battery life).
The base-model iPads have 3GB memory which is probably the right tradeoff to produce a ~$300 tablet, but looking at Marques Brownlee skimming through open apps on a 16GB iPad Pro it sure looks like more memory helps since apps almost never have to be closed by iPadOS.
Apps
iPadOS has had full Safari since version 13 and using an app versus a web-app is often a wash in my experience. Especially because some apps don’t support affordances like selecting and copying text that you’re used to on the web. I still use plenty of apps though, so I wanted to call out some of the high-and-lowlights.
I’m not the first one to point this out, but the Google productivity app suite (Docs, Sheets) is not good on iPadOS and you’re almost always better off using those services with Safari (or Chrome maybe, I didn’t try). I can understand why iPadOS is not a priority for Google, but it’s really a shame since those are otherwise such great services.
I can also understand why Amazon doesn’t prioritize the Apple ecosystem, but Amazon Fresh missing from the Amazon iPadOS app is really frustrating, especially since it’s in the iOS app.
The built-in Apple Files app is terrible. Trying to copy large files around or transfer them over the network will reliably cause the whole iPad to grind to a halt, the only action I’ve found to do that. It’s like Apple ended up in some strange middle-ground between the paradigms of strong on-device processing and cloud-first data storage, and the result is frustration. The file transfer problem is particularly frustrating because it’s been adequately solved on literally all other computing platforms I’ve used in the past decade. I tried a handful of 3rd party file apps but they either sucked in different ways or came with adds and other cruft.
The Microsoft Remote Desktop app is great. Part of the reason I could make do with just an iPad for so long was definitely that I had a full Windows VM on my home server that I could access to do the few things that just didn’t work on the iPad. The Remote Desktop app mostly bridges the iPad/Windows divide with sane defaults for what keys and keyboard shortcuts do and clearly a lot of thought and care has gone into making that seamless. The contrast with remote desktop’ing into a Mac is stark. Apple provides no built-in way to do this (from an iPad) and the assorted VNC-based apps and tools in the Apple ecosystem compare very poorly with Microsoft Remote Desktop.
The Photos app is good but as mentioned above its tendency to gobble up storage is a problem. There’s a very strange incompatibility where videos shot on my iPhone 12 Pro Max in 4K 30fps cannot be edited in the Photos app on the iPad. iMovie on the same iPad can edit those videos just fine, so it’s not a hardware or codec limitation. I prefer cropping videos on the iPad over my phone, but having to install 750MB of iMovie (which is also more cumbersome for simple things than editing right in Photos) ruins that.
Editing videos shot on iPhone doesn’t work in Photos app on iPad
Summary
So would I recommend a base-model iPad for your main computing device? No, not if you like “normal” computers and can afford a decent Mac or Windows laptop. And I’m not sure I’d feel different if I had tried this experiment with an iPad Pro, the OS is just too quirky and limited. But for less than $300 these iPads are incredible devices and I heartily recommend them to anyone than can live within the constraints or for whom the constraints (and the improved reliability and stability you get as a result) are actually a benefit.
This post covers how I upgraded our home thermostat from a battery-powered two-wire setup to an Ecobee3 Lite supporting both heating and fan-only modes. I wanted the fan-only mode to circulate air in our two-level condo where hot days often result in a hot and stale 2nd floor and a frigid 1st floor.
Note that I’m neither an electrician nor an HVAC pro and it’s very possible that what I did is a very bad idea. But it worked for me, so I thought I’d share.
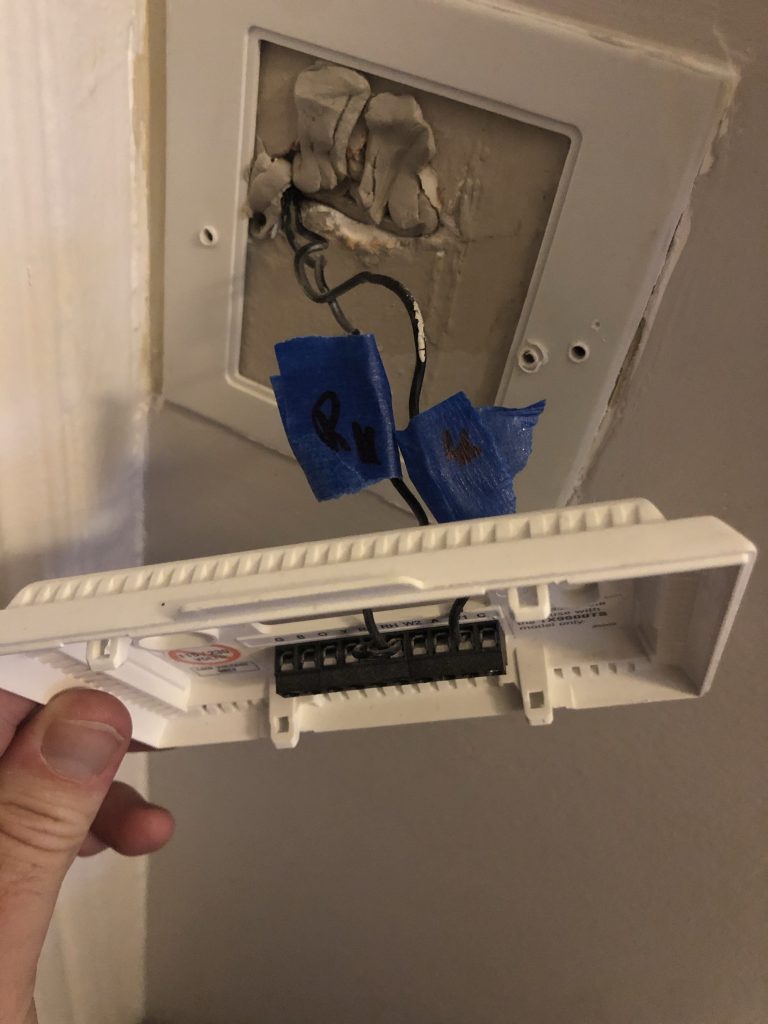
Our house only has two wires running from the thermostat mount in the condo to the furnace in the garage, just enough to complete an electrical on/off circuit used to tell the furnace whether to heat or not. This is the dreaded “no C-wire” situation with no way to power a smart thermostat and no way for the thermostat to tell the furnace to just run the air circulation fan. Our furnace is relatively modern and has more wire terminals, but running additional wires from the condo down to the garage was not really an option.
Two wires 🙁
To overcome this I bought two items:
A 24V transformer that’s plugged into an outlet near the thermostat mount inside the condo. This powers the Ecobee
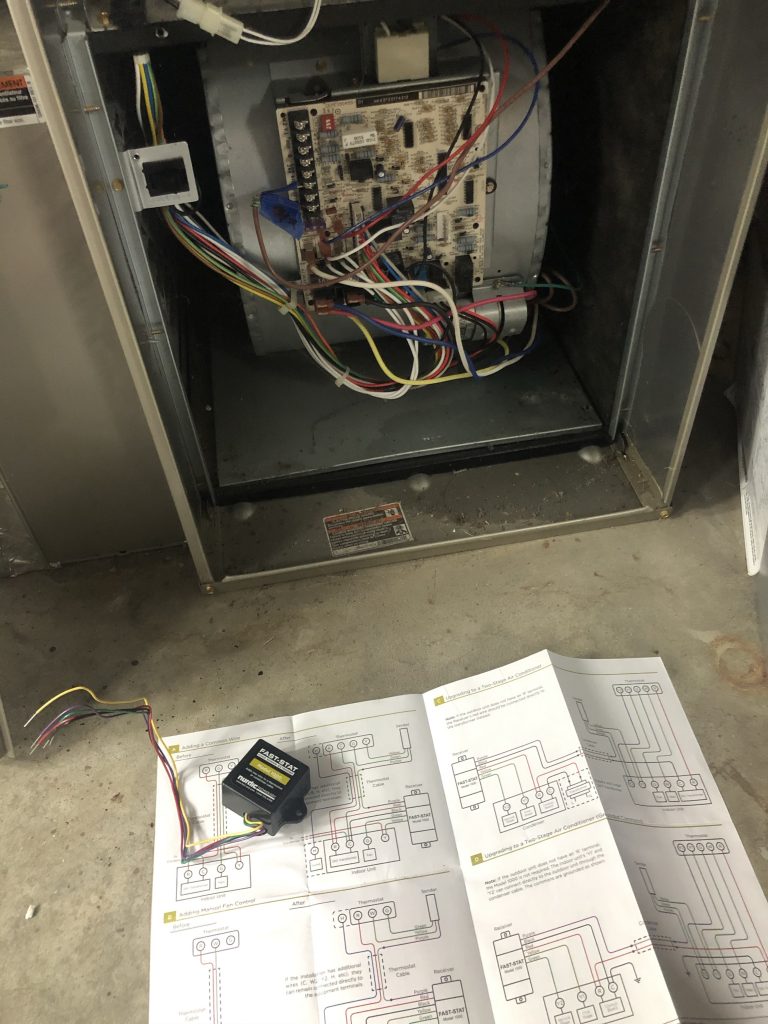
A Fast-Stat Model 1000. This gizmo consists of sender (inside) and receiver (furnace) components. It works by multiplexing additional control signals (for fan-only, in my case) over the single installed wire-pair. Higher-model-number Fast-Stats can provide more virtualized wires, but I just needed one
The first step was to install the Fast-Stat. It comes with easy-to-follow instructions and wiring it into our furnace’s clearly labeled bread-board-like circuit board was relatively simple.
Furnace-side Fast-Stat install
With the Fast-Stat installed I could run both heating and fan-only modes using the old dumb thermostat, validating that it’s working correctly.
Next, I mounted the new Ecobee and wired it up with the wires from the Fast-Stat and from the 24V transformer. The first time I did this, I got it wrong. I wired the transformer wires to C (“Common”) and R(c) (for “Red-Cooling”, I believe) and put the black wire in R(h) (for “Red-Heating”). I guess I thought that the Ecobee wanted it that way because it’s going to be running the heating system (hence R(h)) and the transformer instructions said to connect to C and R(c) wires.
With that ready the Ecobee turned on fine and all the wires showed up in the Ecobee configuration interface. Heating even worked! I couldn’t make the Ecobee run the fan-only mode, however, and at this point I actually gave up on fan-only for a couple of months, happy that I could at least control heating using the fancy new smart thermostat.
This weekend I had a chance to fiddle with the thermostat some more, and managed to get everything working. First I tried just connecting the G (“Green”) terminal (which runs just the fan) to R(h) with a piece of wire and the fan duly started whooshing air around. This was not surprising since the old dumb thermostat could to that too, but at least it showed that the wiring and connections on the Ecobee mount were OK.
Then I tried simply reversing the inputs to the R(c) and R(h) terminals so the transformer wire went to R(h) and the furnace control wire to R(c). In that configuration the Ecobee wasn’t getting any power and wouldn’t turn on. The breakthrough was to simply jam both the transformer and the furnace control wire into the R(c) terminal of the Ecobee mount. Re-reading the Ecobee instructions that makes some sense because the Ecobee wants to always use the R(c) terminal for systems with only one R-wire.
Working setup
In spite of much googling I never found complete instructions for combining a 24V transformer and a Fast-Stat to make an Ecobee work for both heating and fan-only with a two-wire system. I hope this post helps others with the same setup.
Podnanza is a simple screen-scraper/feed-generator that I built for my own amusement to podcast shows from Danish Radio’s (DR) Bonanza archive. Check out the Podnanza announcement post for details. This post describes how Podnanza was built using ASP.NET Core running on AWS Lambda. The Podnanza source code is on GitHub.
I’ll start by admitting that AWS Lambda is the wrong technical architecture for Podnanza. Nothing’s wrong with Lambda, but Podnanza is a set of very static RSS feeds: The shows are from DR’s archive and don’t change or get new episodes. A simpler Podnanza implementation would have been a static-site generator that scraped the archive and put the XML RSS feed files in AWS S3.
I opted for Lambda for the very bad reason that I wanted to learn about serverless/function-based development by implementing a “real” project, and Podnanza was the realest small-size idea on my mind at the time. At least it’ll only be me that has to deal with maintenance of the over-complicated setup.
FaaS and HTTP Apps
Working (as I do) on PaaS/FaaS/Serverless products one might encounter arguments like:
FaaS is event-based programming and HTTP requests can be thought of as events. If a PaaS platform has good autoscaling and scale-to-zero (idling) then separate FaaS-features are not needed—people should just build FaaS apps as normal HTTP services.
Or the other way around:
If we have FaaS and event-based programming, why would we also support long-running processes for serving HTTP requests? People should just build HTTP apps from FaaS features since dealing with HTTP requests is an example of handling events
In the abstract, both of these of these statements are correct but they also obscure a lot of useful nuances. For example, even the slickest HTTP app platform pushes some HTTP handling overhead onto developers. Programs that only have to accept events through an interface defined in an SDK maintained by the FaaS platform can be a lot simpler than programs dealing with HTTP, even when a HTTP endpoint is only required for ingesting events. And because event-handling is a more constrained problem than general HTTP, platform-provided tooling such as SDKs and test-mocks can be more targeted and effective.
Similarly, forcing all HTTP apps to be built by handling events coming through a FaaS platform event interface is not ideal either:
Lots of apps have already been built using HTTP frameworks like Node.js Express, and those apps would have to be rewritten to conform to the event interface
Many developers are very experienced and productive building HTTP apps using existing HTTP frameworks and it’s not worth it for them to ditch those frameworks for an event-based HTTP model, even if it comes with slightly reduced management overhead
FaaS interfaces are still largely proprietary and platform-specific, causing lock-in (although middleware like the Serverless Framework can help mitigate that). HTTP apps, on the other hand, can run anywhere
ASP.NET Core on AWS Lambda
With all that out of the way, let’s look at how AWS made ASP.NET Core respond to HTTP requests on Lambda. Spoiler alert: It’s a pretty clever blend of the two dogmas outlined above.
Generally serverless “web apps” or APIs are built with Lambda by using an AWS API Gateway (optionally combined with CloudFront for CDN and S3 for static assets) that sends API Gateway Message Events to a Lambda function. The events are basically JSON-formatted HTTP requests, and the HTTP “response” emitted by the function is also JSON formatted. Building a serverless .NET web app on top of that would be pretty frustrating for anyone familiar with ASP.NET because all of the HTTP, MVC, routing and other tooling in ASP.NET would not work.
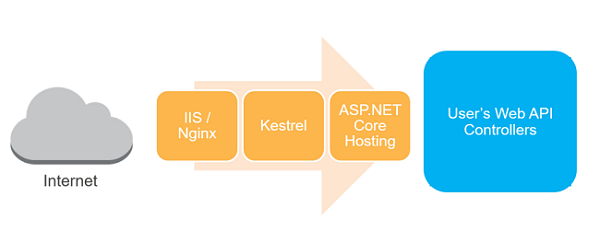
But here’s the genius: Because the ASP.NET Core framework is fairly well-factored AWS was able to build a HTTP request pipeline frontend (Amazon.Lambda.AspNetCoreServer) that marshals API Gateway Message Events and feeds them into the rest of ASP.NET Core as if they were normal HTTP requests (which, of course, they were before the AWS API Gateway messed them up and turned them into JSON). The AWS blog post has more details and also diagrams (reproduced below) showing the two execution models.
The result is that ASP.NET Core web apps can be debugged and tested locally using the “standard” IIS/Kestrel-based pipeline and then built and deployed using the Amazon.Lambda.AspNetCoreServer based pipeline for production deploys to AWS Lambda. AWS even ships Visual Studio plugins and dotnet newtemplates that make getting started simple.
While neat, the Lambda approach completely ignores the ideal of dev/prod parity and the execution framework during local testing (with IIS/Kestrel) is very different from the production environment. Somewhat to my surprise I encountered zero problems or abstraction-leaks with the exotic HTTP setup when building and evolving Podnanza, but I suspect that more complex apps that make fuller use of HTTP semantics might see oddities.
Summary
Podnanza has been running without a hitch on AWS Lambda for more than 6 months at the time this post was written, typically costing around $0.20/month including CloudFront and API Gateway use. I’ve pushed multiple tweaks and improvements without issue during that time, always using the dotnet lambda package. On a side-note I admire the AWS .NET team’s zeal in building the Lambda deploy flow into the dotnet tool, but I wonder if it would have made more sense to just add it to the aws CLI that developers use to complete other AWS tasks. Also note that I haven’t built any CI/CD or GitHub-based deployment flow since it’s just me working on and deploying Podnanza. Maybe improving that would be a good way to learn about GitHub Actions…
This post is likely only interesting if you’re a Danish-speaker.
Podnanza is a screen-scraper and feed-generator that turns radio series from the Danish Radio Bonanza archive into podcast feeds for easy listening in your favorite Podcast app. I built Podnanza mostly for my own enjoyment because I wanted to listen to children’s radio-dramas edited and narrated by Carsten Overskov.
Here are some example feeds with links to the series’ pages on Bonanza:
I’ve submitted one of the feeds to iTunes to see if Apple will list them (they might not). UPDATE: Apple published the podcasts and I’ve updated the links.
If the links are not working for some reason, here’s how to manually add the raw RSS feeds in the iOS Podcasts app:
All of Overskov’s shows were aired as part of DR’s “Children’s Radio” segments but as far as I remember, at least the Ivanhoe edit/re-telling was very graphic and raunchy (much more so than the “adult” original). I didn’t actually listen to the shows as a kid, but heard what must have been a re-airing of Ivanhoe in 1-hour segments on my first minimum-wage job out of high school, assembling door knobs. The shows were reportedly also very popular with long-haul truck drivers.
It’s funny to me that the progressive/left-leaning folks at DR (Carsten Overskov got into trouble for hollering “Advance, comrades—the microphone is with you!” while covering an anti Vietnam War demonstration in front of the American Embassy in Copenhagen in the ’60s) spent all this time retelling and recording Victorian era English novels, but who am I to complain? They’re the same novels my dad read aloud to me when I was a kid—King Solomon’s Mines is the first novel that I remember hearing.
Podnanza dynamically scrapes the Bonanza site to generate the Podcast feed, which is then cached for performance. If you find radio shows on Bonanza that you’d like to consume as a Podcast, simply find the identifier that DR uses for that particular series and stick it at the end of the Podnanza URL. For example, https://www.dr.dk/bonanza/serie/276/ivanhoe/ is the URL for Ivanhoe, so you want http://p.friism.com/p/276 for the Podnanza URL that you add to your podcast app.
Podnanza does support HTTPS but iTunes’ very dated list of trusted CA’s doesn’t include AWS (where Podnanza runs) so I’m just using HTTP urls for now. The code powering Podnanza is on GitHub in case you find bugs or want to help out.
Overskov died a couple of years ago but his work lives on in Danish Radio’s awesome online Bonanza archive. I hope Podnanza will help make consuming these shows easier, and that you’ll enjoy listening to them as much as I know I will.